
How to Remove a Hard Drive or SSD From a Dead Laptop (and When You Shouldn’t)

When a laptop dies, the files on it usually haven’t. In most cases the screen, the motherboard, the battery or the charging circuit has failed, and the drive inside is fine. So the natural next step is to take the drive out and read it on another computer. Sometimes that’s exactly the right move and takes fifteen minutes. Sometimes it’s the move that turns a straightforward recovery into a difficult one, or makes the data impossible to read at all. This guide covers both: the general steps for removing a laptop hard drive or SSD safely, and the situations where you should stop and leave the laptop in one piece.
Laptop dead and the files aren’t backed up?
If the drive clicked, the laptop was dropped or the storage is soldered, stop here. We’ll evaluate the drive or the whole laptop for free.
First, figure out whether there’s a drive to remove
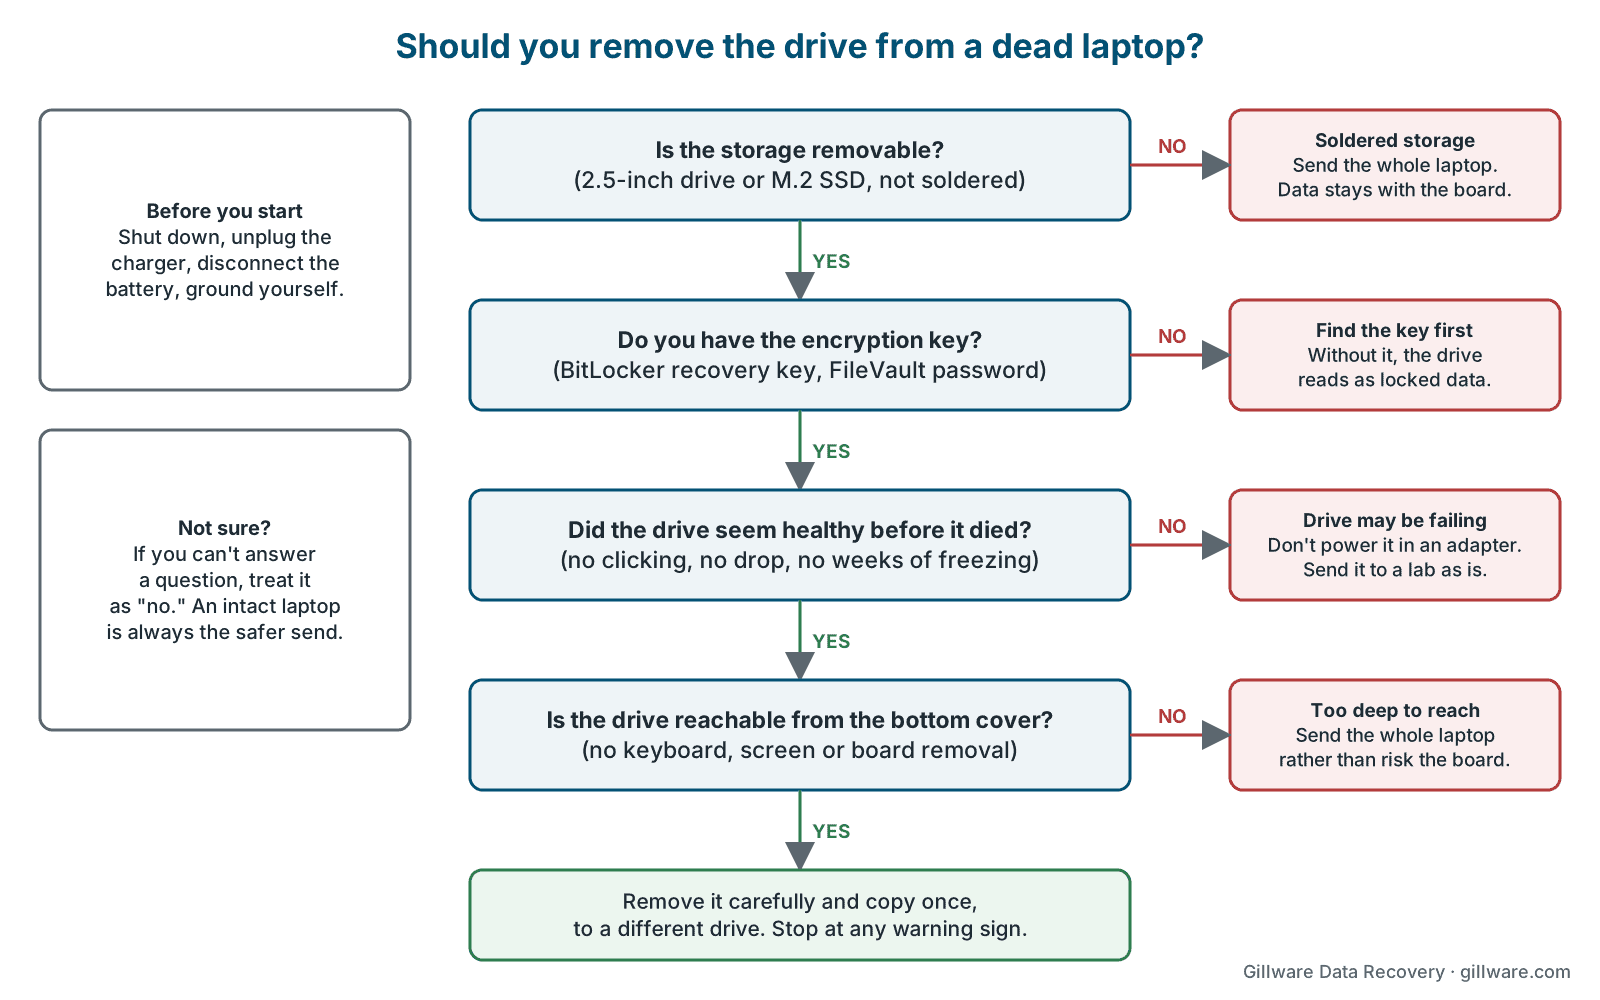
Laptops store data in one of four ways, and only three of them involve a drive you can take out. Before you pick up a screwdriver, find out which one you have. The model number on the label underneath the laptop, searched together with the word “SSD” or “storage,” will usually tell you.
- 2.5-inch hard drive. A small spinning drive, common in Windows laptops built before about 2018 and in budget machines since. It sits in a bay, often in a metal caddy, and connects to a SATA connector.
- 2.5-inch SATA SSD. The same size and connector as the hard drive above, with no moving parts. Many people swapped one in as an upgrade.
- M.2 SSD. A small circuit board about the size of a stick of gum, held down by one screw at the end. Most laptops built in the last several years use one.
- Soldered storage. The memory chips are soldered directly to the motherboard. There is no drive to remove. Every recent MacBook works this way, as do many thin-and-light Windows laptops and some tablets with keyboards.
If your laptop has soldered storage, skip the removal steps entirely. The data can only be read through that motherboard, so the whole laptop is what needs to be recovered. Our laptop data recovery page explains how each storage type is handled in the lab.
Four reasons not to pull the drive
Most of the trouble we see after a do-it-yourself drive removal doesn’t come from the screwdriver. It comes from what happens next, when the drive gets plugged into something else. Stop and leave the laptop as it is if any of these apply.
1. The storage is soldered to the board
Prying at a soldered SSD, or at the shields that cover it, damages the board the data depends on. On MacBooks with Apple silicon or a T2 chip, the storage is also encrypted with keys held by chips on that same board, so the memory can’t be read on its own anyway. Our guide to a MacBook that won’t turn on explains why the data and the board have to stay together.
2. The drive is encrypted to that laptop
Many Windows laptops turn on BitLocker device encryption automatically, especially when you sign in with a Microsoft account, and most business laptops are encrypted by company policy. A drive encrypted this way will show up on another computer as unreadable, or ask for a recovery key. Without that key, a perfectly healthy drive is just locked data. Before you remove anything, find the BitLocker recovery key (for personal laptops it is usually stored in your Microsoft account; for work laptops, your IT department holds it). If you can’t find it, read our page on BitLocker data recovery before you do anything else. Macs with FileVault, and drives encrypted with other tools, work the same way: recovering data from an encrypted drive starts with the key or password.
3. The drive itself might be the thing that failed
If the laptop clicked, ticked, buzzed or beeped before it died, if it was dropped while running, or if it had been freezing and slowing down for weeks, assume the drive is failing. A failing hard drive is damaged a little more every time it spins up. Plugging it into a USB adapter and letting Windows or macOS try to mount it, scan it and index it is one of the hardest things you can do to it. The clicking and signs of a failing hard drive guides explain which symptoms point to the drive. SSDs fail differently but the rule is the same: an SSD that disappears, shows the wrong capacity or freezes the computer should be powered as little as possible (see signs of SSD failure).
4. You’d have to open the drive
Removing a drive from a laptop is fine. Opening the drive itself is not. A hard drive’s platters and heads only work in clean, filtered air, and a drive opened on a desk picks up particles that can scratch the platters the moment it spins again. If anyone suggests opening the drive to “free a stuck head” or “check inside,” don’t.
How to remove a laptop hard drive or SSD safely
If none of the stop signs above apply, the drive is removable, and you know the encryption key (or the drive isn’t encrypted), removal is usually simple. Every model is a little different, so use the manufacturer’s service manual for your exact model if one is published. The general sequence looks like this:
- Shut it down completely and unplug the charger. If the laptop is stuck on, hold the power button until it switches off.
- Disconnect or remove the battery. On older laptops the battery slides or unclips from the outside. On most newer ones it’s inside, and its cable should be unplugged from the motherboard as soon as the bottom cover is off, before you touch anything else.
- Ground yourself. Touch a bare metal surface before handling anything inside, and work on a hard surface, not carpet.
- Open the bottom cover or the drive access panel. Keep track of the screws; they are often different lengths. Plastic clips break easily, so use a plastic pry tool rather than a screwdriver.
- Find the drive. A 2.5-inch drive is a rectangle about the size of a deck of cards. An M.2 SSD is a narrow board near the middle of the motherboard, often under a thin metal or foil shield.
- Remove it gently. A 2.5-inch drive usually slides away from its connector, sometimes with a pull tab, then lifts out of its caddy. An M.2 SSD is held by one small screw; remove it, and the stick pops up at an angle and slides out. Never pull on a ribbon cable or force a connector.
- Put the drive somewhere safe. An anti-static bag is ideal. Label it with the laptop model, and note anything you saw (a burnt smell, liquid, a loose connector).
Don’t take the laptop apart beyond what you need to reach the drive. If a step requires removing the keyboard, the screen or the motherboard, the storage is either soldered or buried deep enough that sending the whole laptop is the safer choice. We would much rather receive an intact laptop than a motherboard damaged during disassembly.
Not sure your laptop’s drive is safe to pull or plug in? Ask us first. The evaluation is free.
Reading the drive on another computer
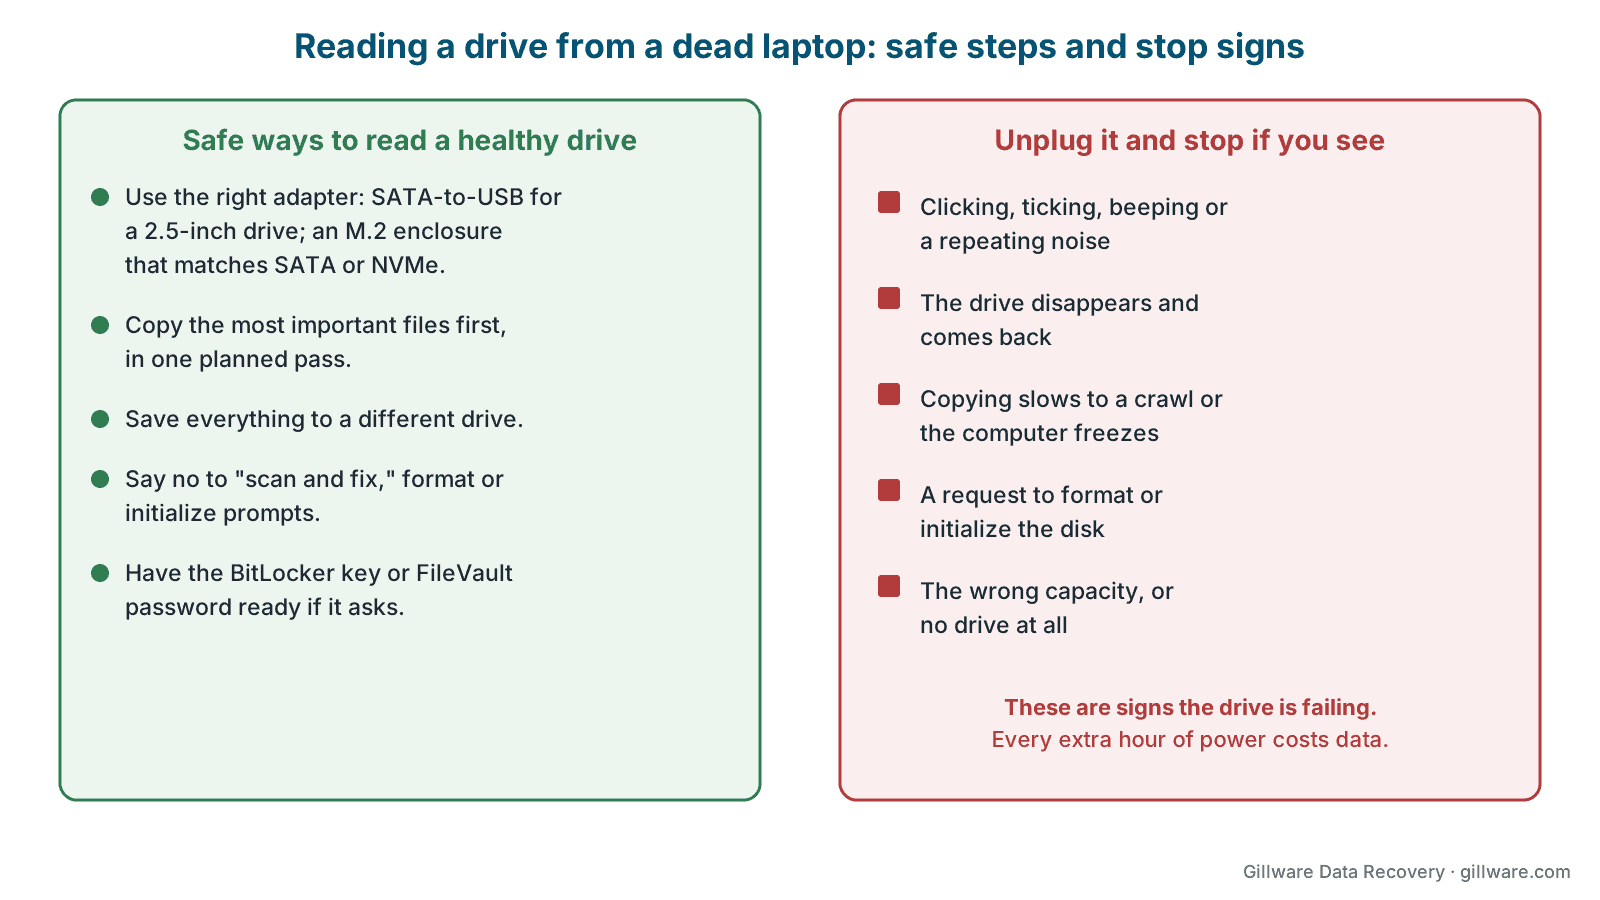
A healthy, unencrypted drive from a laptop that died of something else can usually be read with an inexpensive adapter or enclosure: a SATA-to-USB adapter for a 2.5-inch drive, or an M.2 enclosure that matches the drive’s type (SATA M.2 and NVMe M.2 drives use different enclosures and are not interchangeable). A few precautions make a big difference:
- Plan one careful pass. Decide in advance what matters most, copy that first, then copy the rest. Don’t browse folders at random or open files one by one.
- Copy to a different drive. Never save anything to the drive you’re recovering from, and don’t install anything on it.
- Decline any offer to fix the drive. If Windows asks to scan and fix the drive, or to format it, say no. If macOS says the disk is unreadable and offers to initialize it, choose Ignore. Disk checks and formats write to the drive, and that is the opposite of what you want.
- Stop at the first warning sign. If the drive clicks, makes a repeating noise, disappears and reappears, copies at a crawl or freezes the computer, unplug it and stop. Those are signs of a drive that is failing, not a laptop that failed.
If the drive shows up but your files don’t, or the computer doesn’t see it at all, our guide to a laptop hard drive that isn’t detected walks through what each symptom means. A drive that worked yesterday and is silent today is covered in hard drive stopped working.
What not to do
- Don’t keep powering the laptop on to see if it will start this time. If the drive is failing, every attempt costs data.
- Don’t put a clicking or dropped drive in a USB adapter “just to check.” Send it in as it is.
- Don’t run recovery software on a drive that’s misbehaving. It works the drive hard for hours, and on a failing drive that is how a recoverable case becomes an unrecoverable one.
- Don’t put the drive in the freezer. It’s old advice, it doesn’t help modern drives, and the condensation it causes can make things worse.
- Don’t let anyone replace the motherboard or reset the laptop before the data is safe. On laptops with soldered or encrypted storage, a new motherboard means new, empty storage, and a reset erases the old data.
When to send the whole laptop instead
Send us the whole laptop, not just the drive, if the storage is soldered, if you can’t tell which kind of storage it has, if reaching the drive means taking the laptop deeper apart than a bottom cover, or if the laptop was in a fire, flood or spill. Include the charger, and keep the BitLocker recovery key, FileVault password or login password handy; we’ll ask for it once the data has been imaged. If you’ve already removed the drive and it’s one of the failing cases above, simply send the drive on its own in an anti-static bag with plenty of padding.
How we recover data from laptop drives
Every case starts with a free evaluation. Our engineers identify what failed (the drive, the board, the encryption, or several at once), then image the storage with equipment that controls how a failing drive is read, so weak areas aren’t hammered over and over. Mechanically failed hard drives are opened only in our ISO 5 (Class 100) cleanroom, where failed heads or motors are replaced with matched donor parts before imaging. For SSDs and soldered storage, the work happens at the firmware and board level, which is covered on our SSD data recovery page. Once we have a complete image, we rebuild the file system and check the files you told us matter most.
Every case is quoted after a free evaluation, so you know the cost before any recovery work begins, and you only pay if we meet your recovery goals. Gillware has been recovering data for more than two decades, and since 2004 we’ve recovered data from more than 100,000 storage devices. For more on how we handle every kind of hard drive, see our hard drive data recovery services.
Frequently asked questions
Can I get files off a dead laptop without removing the drive?
Sometimes. If the laptop still powers on but won’t boot, a technician can sometimes start it from external media and copy files off. If it won’t power on at all, the drive has to be read somewhere else, either by removing it or, for soldered storage, by getting the board working in a lab.
Will my files be readable if I put my laptop drive in another computer?
If the drive is healthy and not encrypted, usually yes. If it’s protected by BitLocker or FileVault, you’ll need the recovery key or password. If the drive itself is failing, plugging it in can make things worse, so stop at the first sign of trouble.
How do I know if my laptop’s SSD is soldered?
Search your laptop’s exact model number with “SSD” or check the manufacturer’s specifications. If the storage is listed as onboard or soldered, or you find no M.2 slot or drive bay inside the bottom cover, it’s soldered. All recent MacBooks have soldered storage.
Is it safe to remove the hard drive from a laptop that was dropped?
Removing it is usually fine, but don’t power it on afterward. A drop while the laptop was running can damage a hard drive’s heads or platters, and spinning it up again in an adapter can scratch the platters. Remove it carefully, pad it well and send it to a lab.
Should I remove the drive before sending my laptop for data recovery?
Only if it’s a removable drive and you’re comfortable doing it. If you’re unsure, send the whole laptop. It lets us check whether the failure is in the drive or the board, and on encrypted laptops it can make the data easier to unlock.
Can recovery software fix a laptop drive that won’t show up?
Software can’t help a drive the computer can’t see, and on a failing drive it can do harm by running it for hours. If the drive is detected and healthy, simple copying is usually enough. If it isn’t, that’s a job for a lab.
Laptop won’t start? Let’s get your files back.
Our highly experienced engineers strive for the highest success rates in the industry. Send us the device and we’ll diagnose it for free.
- More than 20 years recovering data from failed drives
- Trusted by 1,500+ IT professionals nationwide
- Whatever failed, we’ve seen it hundreds of times
- Pay only if we meet your recovery goals
