
BitLocker Data Recovery: What to Do When an Encrypted Drive Fails

A failing drive is stressful. A failing drive that’s also BitLocker-encrypted is worse — because every standard recovery shortcut suddenly has a 48-digit padlock in front of it. Whether you’re an IT admin staring at a degraded server volume, an MSP fielding a frantic call from a client, or an individual whose laptop won’t boot past a blue recovery screen, the path forward depends almost entirely on the physical condition of the drive and whether the recovery key is in hand.
This guide walks through what’s actually recoverable from a failing BitLocker-protected drive, the scenarios we work on every day, and the forensic process we use to recover data that won’t come back through any standard tool. It also covers the situation more people are landing in for the first time in 2026: on a modern Windows 11 machine set up with a Microsoft account, drive encryption is now on by default, and most people don’t realize their laptop is encrypted until something goes wrong. If you’re finding out about BitLocker for the first time because of a recovery screen, this page is for you too.
What BitLocker Actually Does (and Why It Complicates Recovery)
BitLocker is Microsoft’s full-disk encryption feature, built into Pro, Enterprise, and Education editions of Windows. On modern Windows 11 devices that meet the hardware requirements and are set up with a Microsoft account, an equivalent feature called Device Encryption is enabled automatically, and the recovery key is silently escrowed to that Microsoft account at first sign-in. The result is that a significant fraction of Windows 11 laptops in use today are encrypted whether their owners have thought about it or not, and the recovery key exists whether they know where to find it or not.
When BitLocker (or Device Encryption) is enabled, every block written to the protected volume is encrypted using a Full Volume Encryption Key (FVEK), and the FVEK is itself protected by a small hierarchy of keys and unlock protectors. Understanding that hierarchy is what makes the difference between “I don’t have my recovery key” (usually solvable) and “the data is unrecoverable” (rare, but genuine).
The BitLocker key hierarchy
The keys and protectors sit in three tiers, and every recovery starts by working out where in this hierarchy the unlock chain has broken.
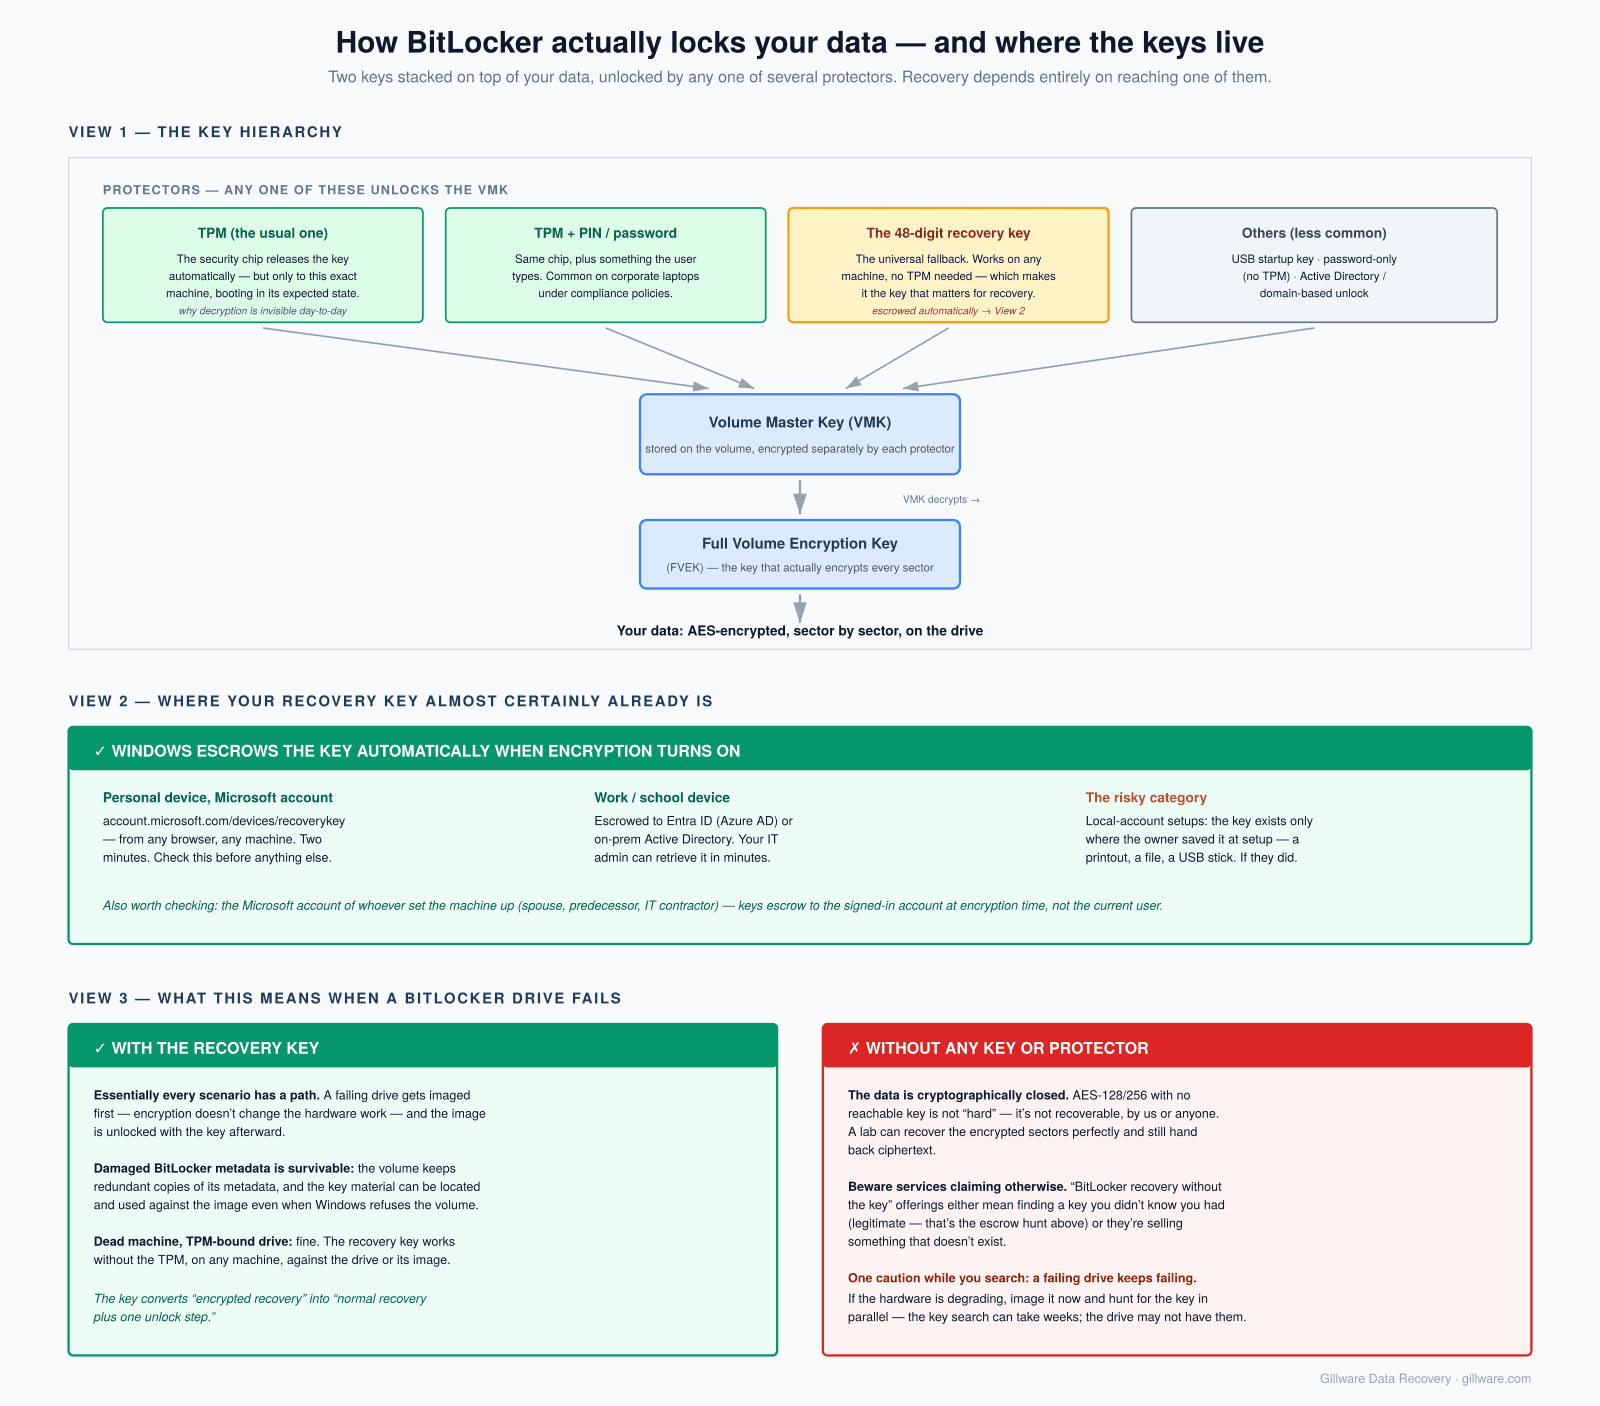
At the top of the hierarchy are the key protectors. These are the things a human or a machine actually presents to the system to unlock the drive: a TPM measurement automatically confirmed at boot, a PIN typed by the user, a USB startup key inserted at power-on, a 48-digit numeric recovery password, or a Data Recovery Agent certificate held by an enterprise IT team. Any single protector is enough to unlock, and BitLocker allows multiple protectors on the same volume — which is why a laptop can boot silently for a user in normal use and still fall back to the recovery password when the TPM measurement changes.
In the middle is the Volume Master Key (VMK). Every enabled key protector holds an encrypted copy of the VMK. When you present a protector, BitLocker decrypts its stored copy of the VMK, and the VMK is what actually gets used at the next step. Adding, removing, or rotating a protector only rewrites its VMK copy; it never touches the VMK itself.
At the bottom is the Full Volume Encryption Key (FVEK). The FVEK is stored on the volume, encrypted by the VMK. This is what actually encrypts and decrypts the data. Once BitLocker has unwrapped the VMK using a protector, and then unwrapped the FVEK using the VMK, the volume becomes readable.
For a normal user, all of this is invisible — the TPM confirms the boot state, the VMK is unwrapped, the FVEK is unwrapped, and Windows loads. The complication appears when something disrupts the unlock chain: a motherboard swap, a firmware update, a corrupted boot sector, or an outright drive failure. At that point, BitLocker falls back to the recovery key, and the recovery-key protector becomes the only remaining way in.
For data recovery, this changes the problem fundamentally. With an unencrypted drive, a recovery engineer can read raw sectors, reconstruct file systems, and pull out files even from severely damaged media. With a BitLocker drive, you can read every raw sector and still see nothing but encrypted blocks without the key. The drive is also far less tolerant of imperfection — a few bad sectors in the wrong place on an unencrypted drive cost you a few files, but the same damage on a BitLocker volume can prevent the volume from mounting at all, locking out everything else.
This is the work we do.
Where the recovery key actually lives
Before assuming a recovery key is lost, walk this list carefully. In our experience, the key is present somewhere in eight cases out of ten; people just don’t know where to look.
- Your own Microsoft account. Sign in at
account.microsoft.com/devices/recoverykeywith every Microsoft account that has ever been used on the device. Keys are listed with the device name, key ID, and drive letter. When a Windows 11 machine was set up with a Microsoft account, this is the default location for the key — and it’s the first place to look even when the owner insists they never set BitLocker up, because Device Encryption enabled itself and put the key there automatically. - A spouse’s, partner’s, or predecessor’s Microsoft account. On shared or hand-me-down devices, the account that first signed in during Windows setup is the one that received the key. If the machine originally belonged to a family member, a former employee, or the person who set it up for you, the key is in their Microsoft account, not yours. This is worth checking even when it feels like a long shot; we see it constantly on machines that were “always mine.”
- Microsoft Entra ID (formerly Azure AD). If the device was ever joined to a work or school tenant, the IT administrator has the key stored centrally and can retrieve it from the Entra admin center. This is worth checking even for devices that have since left the tenant — the key remains associated with the tenant record.
- Active Directory. For domain-joined devices, the key may be in the computer object’s properties under the BitLocker Recovery tab, accessible to domain admins via Active Directory Users and Computers or PowerShell.
- USB drives and printed copies. When BitLocker is enabled manually, the user is prompted to save the key — check labeled USB sticks, printed sheets, password managers, and “important documents” folders. On enterprise devices, the key is sometimes saved to a network share as part of imaging.
- Data Recovery Agent (DRA) certificates. Some enterprise deployments use a DRA certificate that can unlock any drive in the environment. Check with your IT department.
If you have partial fragments of the key — a key identifier without the full 48-digit password, or a key that Windows is rejecting despite matching the identifier — see our missing BitLocker recovery key walkthrough for the case-study scenario where a Microsoft account email change caused a key to vanish from view, and how it was located.
The Scenarios We Recover
Scenario 1: Failing drive, recovery key available
This is the most common scenario we work on. The drive itself has mechanical, electrical, or firmware problems — clicking, not detected, controller failure, head crash — but you (or your IT department, or your Microsoft account) have the 48-digit recovery key.
Recovery here is a two-step process. First, the physical or logical drive issue is addressed enough to capture a clean image of the encrypted volume. Then the recovery key is used to decrypt that image. The drive failure mode dictates the difficulty: a logical failure (corruption, accidental format) is comparatively straightforward, while a mechanical failure (head crash, motor failure) requires cleanroom work and often temporary hardware-level repairs before the drive can even be read.
This is also where DIY attempts most often go wrong. Getting a stable image off a dying encrypted drive is risky because failed imaging attempts — interrupted reads, retried sectors, mounting attempts — can damage the volume metadata BitLocker needs to validate against the key. A drive that arrived recoverable becomes unrecoverable because the metadata got corrupted during a self-recovery attempt. We see this constantly.
Scenario 2: Failing drive AND a recovery key that won’t unlock
Sometimes the drive accepts the recovery key, then asks again immediately. Sometimes BitLocker fails to unlock even when the key matches the identifier. Sometimes the volume mounts but Windows can’t read the file system afterward. These cases typically indicate drive-level corruption affecting the BitLocker metadata or the file system underneath it — and they’re the cases where professional recovery is most valuable.
The usual culprits: deteriorating sectors that hold critical BitLocker structures, firmware-level issues documented by Dell, HP, and Lenovo, partial damage to the NTFS volume that BitLocker is wrapping, or boot-loop bugs that no amount of manage-bde -unlock will resolve. Our recover data from encrypted hard drive workflow covers the broader shape of this problem across encryption formats.
This scenario is also where the most damage gets done by DIY recovery attempts. Booting from rescue media, running disk repair utilities, re-imaging the drive, or trying third-party “BitLocker repair” tools can all permanently destroy the metadata BitLocker needs to validate the key. By the time the drive arrives at a recovery lab, the situation is often significantly worse than it started.
Scenario 3: Unexpected recovery screen after a firmware or hardware change
A BIOS or UEFI update installs overnight. A motherboard is replaced under warranty. A TPM firmware advisory is applied. The machine reboots and lands on a BitLocker recovery screen it has never shown before, demanding a 48-digit password no one remembers seeing.
In these cases the drive is almost always fine. What has changed is the boot measurement that the TPM was sealing against; BitLocker sees a different environment than it was configured to trust, and the TPM protector refuses to release the VMK. The recovery-key protector is the fallback, and once the key is entered, the machine boots normally and BitLocker re-seals to the new environment.
The right move is to find the key using the list above — not to run repair tools, not to reinstall Windows, not to “try to remove BitLocker” from a rescue environment. Every one of those actions can corrupt the metadata that a correct key is trying to validate against, and turn a five-minute unlock into a recovery-lab case. Microsoft Surface devices are especially prone to this pattern because they combine automatic Device Encryption with periodic firmware updates that reset TPM measurements.
Scenario 4: Dead machine with a TPM-bound drive
The laptop is dead. Won’t power on, won’t post, won’t respond to anything — but the drive itself is fine. The owner wants their data off the drive by putting it into an external enclosure or another machine.
This works, right up until BitLocker demands the recovery key that used to be released automatically by the dead laptop’s TPM. Once the drive is out of its original machine, the TPM protector is meaningless; only the recovery-key protector can unlock it. If the key is retrievable via any of the paths above, the recovery is straightforward — we image the drive, decrypt against the key, and hand back the contents. If the key is not retrievable, this is one of the cases where recovery is genuinely blocked, and no amount of forensic work will change that.
This scenario is also the one where BitLocker interacts most directly with SSD-specific failures. Many modern laptops ship with soldered NVMe SSDs; when the motherboard fails, the SSD is often physically stranded on the board. Our SSD data recovery workflow covers the direct-NAND and controller-level techniques we use to get the encrypted data off drives that can’t be moved to another machine.
How We Recover Failing BitLocker Drives
This is where the work happens, and it’s the reason we can often recover data from drives that no amount of consumer-grade troubleshooting will save. Our process has four distinct stages.
Step 1: Temporary hardware-level repairs
Before any data can be read from a failing drive, the drive has to be made readable. For BitLocker volumes this is especially important because the encryption metadata is stored on the drive itself — if those specific sectors can’t be read, no key in the world will unlock the volume.
For mechanically failed drives, this happens in our ISO 5 Class 10 cleanroom, where engineers can transplant heads, repair PCBs, or adjust firmware to bring the drive into a stable enough state to image. These repairs are temporary — they’re meant to keep the drive readable long enough for the next step, not to restore it to long-term use.
Step 2: Write-blocked forensic imaging
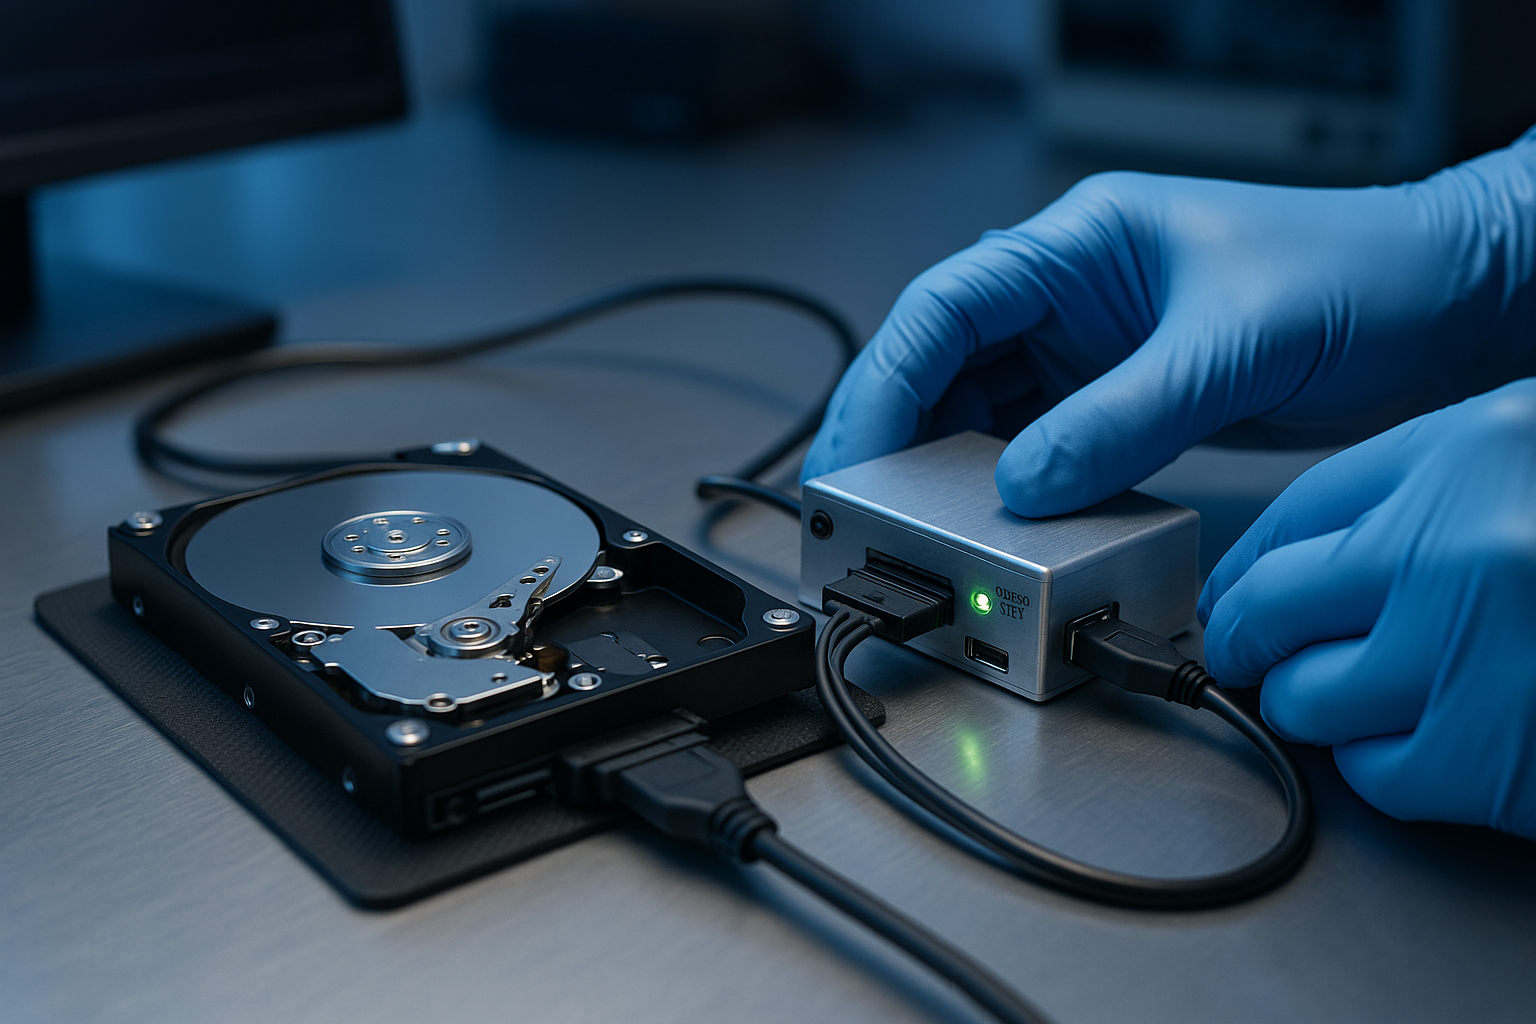
Once the drive is stable enough to read, we connect it through a hardware write-blocker — a device that physically prevents any data from being written back to the source drive. From that protected connection, we capture a bit-for-bit forensic image of the entire drive: boot sectors, partition table, BitLocker volume header, all metadata structures, the encrypted payload, and unallocated space.
The original drive is never written to. Every step that follows happens against the image, not the original media. This is the same chain-of-custody discipline we use for digital forensics cases, and it’s what makes the rest of the recovery process risk-free: if anything we try makes the situation worse, we roll back to the baseline image and try a different approach. The customer’s data is never put in jeopardy by the recovery work itself.
Step 3: Block-by-block decryption
BitLocker encrypts data in fixed-size blocks using AES, and critically, each block is independently decryptable given the FVEK. This matters enormously for recovery: a single damaged sector means losing the data in that sector, not the entire volume.
Using the recovery key (or a key package, where applicable) and the metadata captured in the forensic image, we decrypt the volume block-by-block. Sectors that were physically unreadable get marked, the surrounding data is still decrypted successfully, and the result is a decrypted volume image with the corruption isolated to the specific blocks that were actually damaged. In typical cases this means the vast majority of the volume’s contents come back intact even when the drive itself was in serious physical distress.
Step 4: File-system reconstruction with Hombre
Here’s where most recovery attempts stop and our process keeps going. Even after decryption, the volume often won’t mount as a working Windows file system — file system damage, boot sector corruption, or MFT issues prevent Windows from making sense of it. The data is there, but Windows can’t see it.
Our proprietary tool, Hombre, parses the decrypted volume directly without ever trying to mount it. Hombre analyzes every sector and runs hundreds of pattern-matching operations to identify NTFS metadata structures — Master File Table records, INDX folder records, file system headers, and the recognizable signatures of individual file types (JPG, DOCX, PDF, MP4, and many more). The output is a forensic database of every file the volume contained: name, location, size, timestamps, and recoverable content.
From that database we can extract individual files even when the parent volume is completely unbootable. This is why we can typically recover the vast majority of a customer’s data from a BitLocker drive that no Windows utility could open, no commercial recovery tool could unlock, and no DIY attempt could save.
A note on EFS
BitLocker encrypts the volume. Windows also has an older, per-file encryption feature called EFS (Encrypting File System), which encrypts individual files under the currently signed-in user’s credentials rather than the whole disk. On a machine that uses both, decrypting the BitLocker volume gets you readable file system structures, but individual EFS-encrypted files remain encrypted with a key derived from the user’s password and a certificate stored in the user profile. Recovering those files requires the user’s password and the EFS certificate to still be intact — and if either is missing, the recovery path is different from BitLocker’s. Our EFS data recovery page walks through the specifics.
What’s Not Recoverable (Even by Us)
We’re honest about the limits of what’s possible, because in some BitLocker scenarios there is no recovery path — and customers deserve to know that before spending time and money chasing one.
If the recovery key is truly lost and the drive itself is healthy, no legitimate data recovery service can recover this data — including us. BitLocker uses AES-128 or AES-256 encryption, and there is no backdoor. Microsoft does not have the key. We do not have the key. Any service that claims they can break BitLocker without the key is either misleading you or planning to substitute a different drive. Be especially wary of overseas services that advertise fast, cheap “BitLocker unlock” — the AES-128/256 math is the same for them as it is for anyone, which means their promise is not what it appears to be.
If a legitimate lab tells you that a key-less BitLocker recovery is not possible, that is the honest answer, and it applies regardless of how much you are willing to pay. The right move at that point is to exhaust every path to the key one more time using the six-source list above, and then to accept the answer if the key genuinely does not exist anywhere.
What to Do Right Now If Your Drive Is Failing
If you’re staring at a BitLocker recovery screen on a drive with important data, or worse, the drive is making physical noises it shouldn’t:
Stop trying to “fix” the drive. Don’t run chkdsk. Don’t reformat. Don’t reinstall Windows. Don’t run third-party “BitLocker repair” tools you found on a forum. Each of these can destroy metadata that would have made recovery straightforward, or accelerate hardware failure that’s still partial.
If the drive is making unusual sounds (clicking, beeping, grinding) — power it off and leave it off. Mechanical failures get worse with every minute of runtime. A drive that’s still partially functional is far more recoverable than one that’s been run until it fully seizes.
Find the key first, recovery path second. A drive with an irretrievable key is a much harder problem than a drive with a key and a hardware issue. Spend the first hour searching for the key through the locations above, not troubleshooting the drive.
Document what you know. Before calling for help, gather the make and model of the drive, what happened immediately before the failure, whether the device was domain-joined or in a personal Microsoft account, and any recovery key information you can locate. This shortens the recovery process significantly.
When to Call a Professional
The right time to bring in professional data recovery is before you’ve made the situation worse. Specifically:
- The drive is failing physically (clicking, not detected, intermittent recognition) AND it’s BitLocker-encrypted
- You have the recovery key but Windows is rejecting it or stuck in a recovery loop that doesn’t resolve with standard
manage-bdecommands - The data is business-critical and the drive is a sole copy
- The encrypted volume is part of a RAID array or a failed server — BitLocker-encrypted volumes inside failed RAID configurations are a Gillware specialty, and the combination of encryption and array reconstruction is not something to attempt in-house
- The encrypted volume lives inside a Hyper-V VHDX or is on a virtualized Windows server — see our Hyper-V data recovery page for how these cases layer with virtualization
- The device is a Microsoft Surface or a laptop with a soldered SSD where standard drive-swap options don’t exist
- A previous attempt to recover the drive has failed and you’re not sure what state it’s left things in
Our hard drive data recovery process always starts with a free, no-obligation evaluation. We image the drive in our ISO 5 cleanroom, run it through the forensic pipeline described above, and quote a flat price based on what’s actually possible. If we can’t recover the data, you don’t pay. And when a recovery key truly isn’t available, we’re honest about that limit rather than charging for work that can’t succeed. For broader Windows recovery context, our Windows data recovery pillar covers where BitLocker fits in the wider picture of NTFS, ReFS, and server-storage failures.
BitLocker-Related Error Codes That May Indicate Hardware Failure
If you’re troubleshooting an error code on a BitLocker-encrypted system, the most important question is whether the code points to a software issue (usually fixable through Windows tools) or a hardware issue (where DIY attempts often make things worse). The codes below are the ones we see most often on drives that arrive at our lab for BitLocker recovery, grouped by what they typically indicate.
A few rules of thumb before you start troubleshooting:
- If you see two or more of these codes on the same machine, treat it as likely hardware failure and stop running repair tools until the drive has been imaged.
- If a code returns after Windows automatic repair “fixes” it, the drive is the problem, not the boot data.
- If the machine is making unusual sounds (clicking, beeping, repeated relocations) — power it off and contact us before anything else.
Codes that frequently indicate drive or storage hardware failure
| Code | What you see | Typical cause | Recovery relevance |
|---|---|---|---|
| 0xc0000225 | “Your PC needs to be repaired” / “A required device isn’t connected or can’t be accessed” | Corrupted BCD or boot files — but on a BitLocker drive this often means BitLocker metadata corruption from underlying sector damage | High — if repair attempts loop or the drive shows other failure signs, stop and call a recovery lab |
| 0xc000000f | “An error occurred while attempting to read the boot configuration data” | The drive can’t reliably read the BCD partition — often the first warning sign of a failing drive | High — especially if the error returns after repair |
| 0xc0000034 | “Boot configuration data file is missing required information” | BCD damage; on a BitLocker volume this can indicate physical sector damage where the boot data lives | Moderate to high depending on drive symptoms |
| 0xc00000e9 | “An unexpected I/O error has occurred” | I/O failure between OS and storage device — a strong signal of failing drive hardware, cable, or controller | High — I/O errors are one of the clearest warnings of drive failure |
| UNMOUNTABLE_BOOT_VOLUME (0x000000ED) | Blue screen citing the boot volume can’t be mounted | File system damage on the boot drive, often caused by bad sectors | High when the volume is BitLocker-encrypted, because chkdsk can destroy metadata |
| INACCESSIBLE_BOOT_DEVICE (0x0000007B) | Blue screen | Windows can’t access the boot drive — frequently storage controller or drive hardware | High |
| CRITICAL_PROCESS_DIED (0x000000EF) — when recurring | Blue screen | Usually software, but recurring instances after BitLocker recovery prompts often indicate underlying drive corruption | Moderate |
| WHEA_UNCORRECTABLE_ERROR (0x00000124) | Blue screen | Hardware-level failure — storage, RAM, or CPU | Moderate to high — needs hardware diagnosis |
BitLocker-specific error codes
| Code | What it means | Recovery relevance |
|---|---|---|
| 0x80310000 family | BitLocker general / configuration errors | Usually configuration, not hardware — but if the drive is also failing physically, that changes the picture |
| 0x8031004A | “The system cannot find the file specified” BitLocker error | Often metadata corruption — recovery-relevant if drive shows hardware issues |
| 0x80310024 | BitLocker drive is in a different state than required | TPM/key protector issue — usually not hardware, unless combined with drive failure symptoms |
| 0x80310059 | “BitLocker is already performing an operation” | Operational state issue, not hardware |
| BITLOCKER_FATAL_ERROR (Bug Check 0x120) | Kernel-level bug check from BitLocker driver | Often indicates the encryption driver hit an unrecoverable state — investigate drive health immediately |
TPM and firmware-related codes (motherboard side)
| Code or situation | What it indicates | Recovery relevance |
|---|---|---|
| “TPM measurement is missing” | TPM hardware issue or BIOS/firmware change broke the seal | Usually requires recovery key, not data recovery — unless the drive is also failing |
| Recovery loop after BIOS update | TPM seal broken by firmware change | Recovery key needed; data is usually fine |
| Motherboard replacement triggering BitLocker recovery | TPM is bound to specific motherboard | Recovery key needed; data is usually fine |
| Persistent recovery prompts even after entering correct key | Either firmware bug (Dell/HP/Lenovo have documented variants) OR BitLocker metadata corruption on the drive | High recovery relevance if the second cause — a recovery lab can determine which |
OEM-specific codes worth noting
| Code | Make | What it means |
|---|---|---|
| Lenovo Error 1962 | Lenovo | “No operating system found” — often a drive failure, sometimes BIOS settings |
| Dell 2000-0142 / 2000-0146 | Dell | Built-in diagnostic codes indicating drive failure detected by Dell SupportAssist |
| HP SMART hard disk error 301 / 303 | HP | SMART has detected impending drive failure — back up immediately and don’t power-cycle |
| “Boot device not found” / “No bootable device” | Generic | The system can’t see any drive to boot from — often drive failure or cable/controller issue |
If your system is showing any of the codes flagged as High recovery relevance above — especially in combination with each other or with physical drive symptoms — the safest move is to stop troubleshooting and contact us before the situation gets worse. Most of the time we receive these drives after someone has run repair tools that destroyed recoverable metadata; receiving them earlier means more data comes back.
Frequently Asked Questions
Can Gillware recover data from a BitLocker drive without the recovery key?
No, and no legitimate data recovery service can. BitLocker uses AES encryption with no known viable attack against properly generated keys. Beware of any service that claims otherwise. What we can do is help you exhaust every possible source of the key, and recover data once a key is located — even from drives in serious physical distress.
Will the drive be more damaged by sending it to recovery if it’s already failing?
The opposite, in fact. We work from a forensic image, so the original drive is only powered on long enough to capture that image through a write-blocker. Once we have the image, every recovery attempt happens against the copy. This is far safer than continuing to try the drive on your own equipment, where each boot attempt risks pushing partial hardware failure into total failure.
My recovery key is correct but BitLocker keeps asking for it. What’s going on?
This is typically either a known firmware-level issue (Dell, HP, and Lenovo have all documented variants of this) or corruption in the BitLocker metadata on the drive. Some cases resolve with the Dell-documented manage-bde -unlock workflow from a command prompt. For the rest, the metadata needs to be repaired before the key will work — which is recovery-lab territory, and exactly the kind of case our Step 2 and Step 3 process is built for.
Does Gillware work with Microsoft Entra ID / Azure AD managed devices?
Yes. We frequently work with IT departments and MSPs on devices managed through Entra ID or AD DS. If you can retrieve the recovery key from your tenant’s admin console, that’s all we need on our end. We can also work with key packages exported via manage-bde -KeyPackage for cases where the standard recovery password isn’t sufficient.
What if the BitLocker drive is part of a failed RAID or server?
This is one of our specialties. RAID failures combined with BitLocker encryption are particularly punishing because they multiply the complexity — the array has to be reconstructed before BitLocker can even be addressed, and getting it wrong in either layer can lose data. We handle the full chain: array reconstruction, forensic imaging, decryption, and file-system recovery.
Is this related to your “Missing BitLocker Recovery Key” article?
Yes — that older case study walks through one specific scenario where a Microsoft account email change caused a recovery key to disappear from a Surface Pro 3. It’s a useful read for anyone trying to track down a key that should be in their Microsoft account but isn’t showing up.
The Bottom Line
BitLocker is doing exactly what it’s designed to do — preventing unauthorized access to your data. When that design intersects with a failing drive, the recovery picture depends on two things: whether the key is available, and whether the work is being done by someone who knows how to recover encrypted data without making the situation worse.
If you’re dealing with a failing or inaccessible BitLocker drive — especially if the drive is making physical sounds or rejecting an otherwise correct recovery key — Gillware offers a free, no-obligation evaluation. We’ll tell you honestly what’s recoverable, what isn’t, and what it would take. You only pay if we successfully recover your data.

Failing BitLocker drive or an unlock that keeps looping?
Get a no-cost evaluation from Gillware’s engineers. Call 877-624-7206 or start a case online.
Submit a BitLocker Recovery Case
No upfront cost · You only pay if we recover your data
