
An external hard drive that has stopped working is one of the most common reasons people call a data recovery lab, and one of the most misunderstood. The drive on your desk is really two products in one box: a storage drive, and an enclosure with its own circuit board, connector, and sometimes its own encryption. Either half can fail, they fail in different ways, and the right next step depends on which one it is. This page explains how external drives are built, how to tell an enclosure problem from a drive problem, what to do right now, and how Gillware recovers data from portable and desktop external drives when the drive itself has failed.
Gillware has recovered data from external hard drives for more than two decades, across every generation of the format: FireWire and early USB desktop drives, bus-powered 2.5-inch portables, hardware-encrypted drives, and the portable SSDs that are replacing them. If your drive is clicking, beeping, not showing up, or was dropped, the short version is: unplug it, do not keep trying it, and read the section on what not to do before anything else.
What is actually inside an external hard drive?
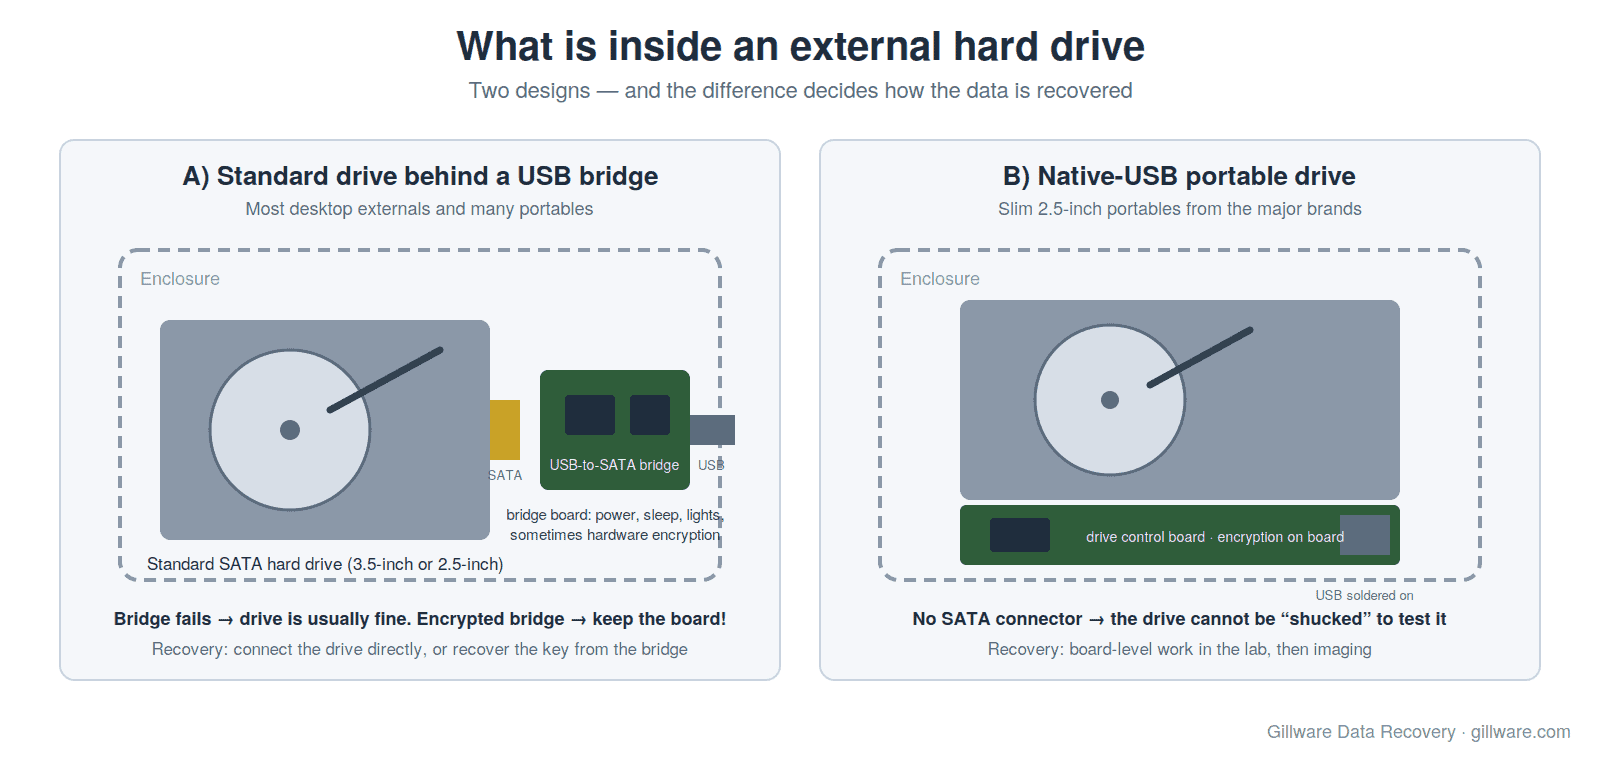
Open a typical external drive and you will find one of two designs.
A standard drive behind a USB bridge
Most desktop externals and many portables contain an ordinary 3.5-inch or 2.5-inch SATA hard drive, the same kind found inside a desktop or older laptop. A small circuit board called the USB-to-SATA bridge sits between the drive and the cable. The bridge translates USB traffic into SATA commands, handles power, and often adds features the bare drive does not have: sleep timers, activity lights, and in some product lines hardware encryption. When the bridge fails, the drive behind it is usually fine, and the data is intact.
A native-USB drive
Many slim portables from the major brands skip the bridge entirely. The drive’s own control board has a USB connector soldered directly to it, and there is no SATA interface to fall back on. If the connector breaks or the board fails, there is no simple way to connect the drive to anything else. These drives also tend to carry hardware encryption on the board itself, which matters a great deal in recovery, as explained below.
Enclosure failure or drive failure? How to tell
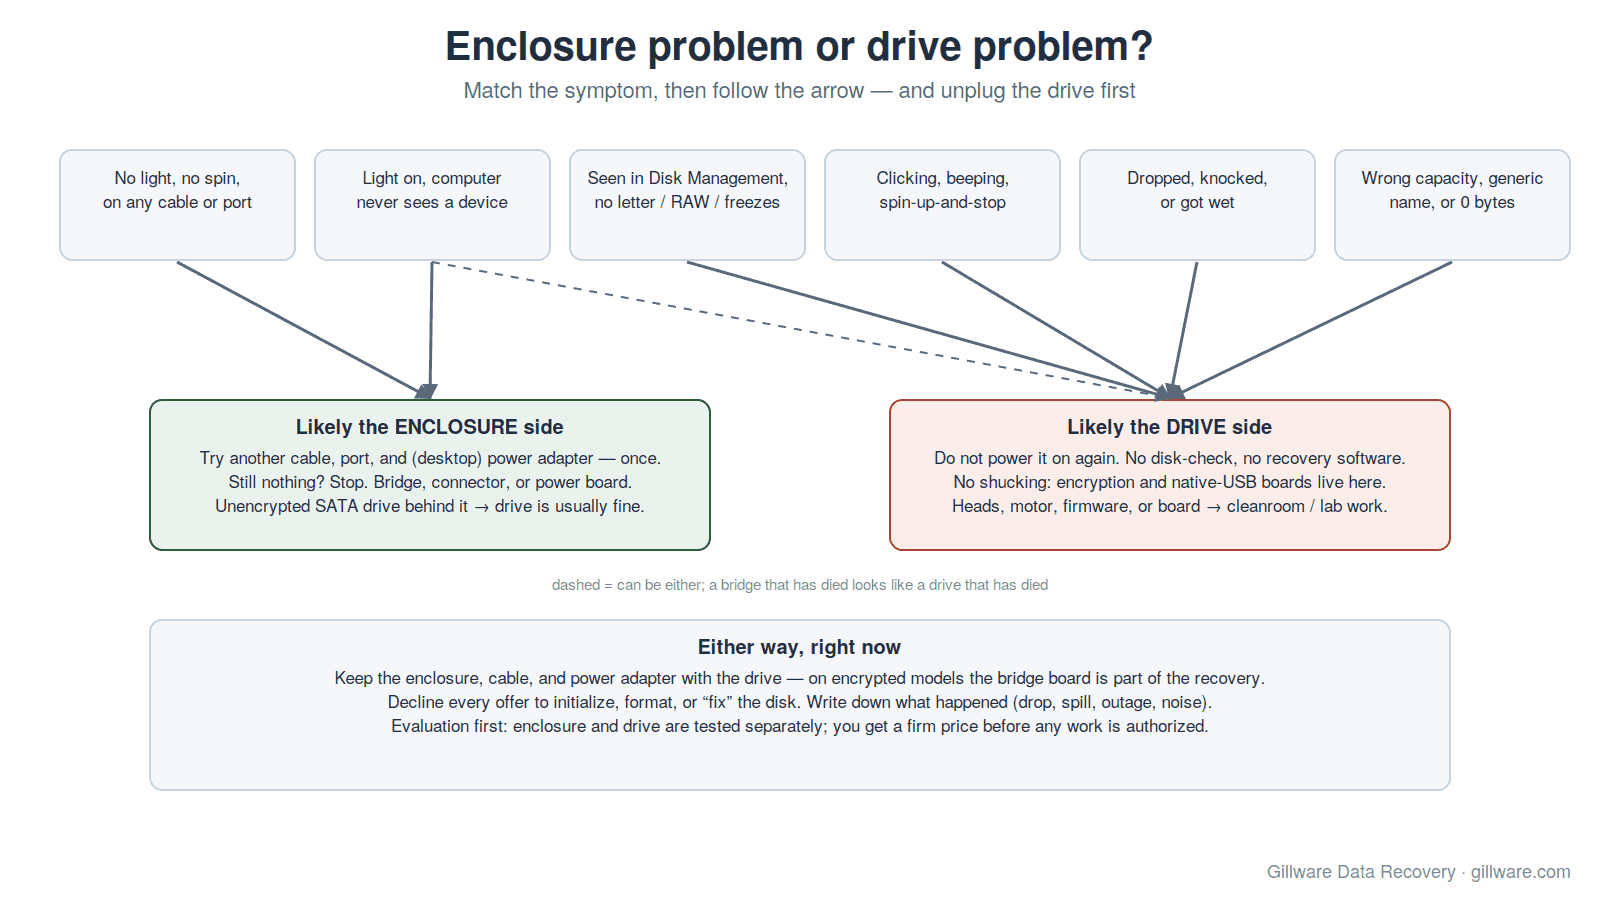
The single most useful thing you can do before calling anyone is work out which half has failed. The symptoms overlap, but they are not identical.
Signs that point to the enclosure, bridge, cable, or power
- The drive does not spin up or light up at all, on any cable and any port, and a desktop drive’s power adapter is warm or silent.
- The activity light comes on but the computer never sees a device, even in Disk Management or Disk Utility.
- The drive appears and disappears when the cable is wiggled or the connector is touched.
- The drive worked until a power event, a knocked-out cable, or a new computer, and there was no drop and no noise.
Signs that point to the drive itself
- Clicking, ticking, or a repeated spin-up-and-stop cycle. That is the read/write heads failing to find their position, and it is covered in depth on our hard drive clicking post.
- Beeping or a faint whine with no spin. The motor is trying to turn platters it cannot move, usually because the heads are stuck to the platter surface.
- The drive shows up in Disk Management as the right size but with no drive letter, or as RAW or unallocated, or the computer freezes whenever it is connected. Our guide to an external hard drive not showing up walks through those cases one by one.
- The drive shows up with the wrong capacity, a generic name, or zero bytes. That is a firmware or controller problem on the drive, not the bridge.
- It was dropped, even a short distance, even while powered off. Drops are covered separately on our dropped hard drive recovery page.
Why “shucking” the drive to test it is risky
The internet’s standard advice for a dead external is to take the drive out of the enclosure and connect it directly to a computer or a USB dock. On a healthy drive behind a failed bridge, that works. On the drives that actually arrive at a recovery lab, it is one of the most common ways to turn a recoverable case into a difficult one, for four reasons.
- Hardware encryption. Many portable drives from the largest brands encrypt everything written to the platters using a key that lives on the bridge or control board, whether or not you ever set a password. Pull the drive and connect it directly and it will appear as unformatted or unreadable. The data is there, but it can only be read through the original board or a board-level recovery of the key. People who format the drive at this point, because the computer offers to, erase the map to their own data.
- Native-USB drives cannot be shucked. There is no SATA connector to move to. Prying at the board or connector usually damages the one path the data can travel.
- Every power cycle on a failing drive costs something. A drive with weak heads or a marked platter degrades every time it spins up and tries to read. If the drive was clicking in the enclosure, it will click on the dock too, and the damage accumulates.
- Some enclosures use non-standard sector translation. Certain bridges present the drive to the computer with a different sector size or an offset than the bare drive uses. Connected directly, the partition table looks wrong, and again the computer offers to initialize or format a drive that is not actually broken.
If the drive was working until the moment it stopped, has never made a noise, was never dropped, and you know it is not a hardware-encrypted model, then trying a different cable and a different port is reasonable. Anything beyond that belongs in a lab.
What to do right now
- Unplug it. If it is clicking, beeping, or the computer freezes when it is connected, do not plug it in again to “see if it works now.”
- Do not run disk-check or recovery software against it. Utilities that scan every sector force a failing drive to retry the weak ones over and over. Software cannot help a drive with a mechanical or electronic fault, and it can finish off a drive that a lab could have imaged.
- Do not open the drive. The enclosure is fine to open if you need to check a cable or see a model number. The sealed metal drive inside is not; platters are contaminated by a single fingerprint or dust particle.
- Do not accept the offer to initialize, format, or “fix” the disk. Windows and macOS will both offer. Decline. Those prompts rewrite the structures that describe where your files are.
- Keep the enclosure, the cable, and the power adapter together with the drive. On an encrypted drive, the bridge board is part of the recovery. Send it all.
- Write down what happened. Drop, spill, power outage, the noise it made, what the computer said. That history shortens the evaluation.
Common external hard drive failures and how we handle them
Failed USB bridge or connector
The most straightforward case. If the drive is a standard SATA unit behind a bridge and is not encrypted, it is connected directly to our imaging hardware and read normally. If the bridge carried encryption, we work with the original board, a donor board, or the key material recovered from the failed board, then decrypt the image. A broken USB connector on a native-USB drive is a micro-soldering job at the board level, followed by the same imaging process.
Mechanical failure: clicking, beeping, not spinning
The drive inside is a hard drive like any other, and mechanical failures are handled in the cleanroom: read/write heads are replaced with a matched donor set, seized spindles and stuck heads are freed, and the drive is imaged sector by sector under controlled conditions. Portable 2.5-inch drives are more fragile than their desktop cousins, and because they are carried around, drops and knocks are the leading cause. Our hard drive data recovery hub covers the mechanical process in detail.
Power events
Desktop externals with their own power adapter are exposed to surges and outages in a way bus-powered portables are not. A surge can destroy the bridge, the drive’s control board, or both. Board work on a modern drive means transplanting the drive’s unique adaptive data from the failed board to a donor, not just swapping boards, and that is lab work.
Firmware and translator corruption
A drive that identifies with the wrong capacity, a generic model name, or zero bytes has usually lost part of its firmware or the translator that maps logical sectors to physical ones. The platters and heads are fine; the drive simply cannot find its own data. We work with the firmware at the vendor-specific level to restore access, then image.
Logical damage: formatted, deleted, RAW, or corrupted
When the hardware is healthy but the file system is not, we image the drive first and work on the image. Reformatted drives, drives that show as RAW, and drives that were moved between a Mac and a PC and no longer mount all fall here. The important thing is that nothing new is written to the drive before it is imaged.
Portable SSDs
External SSDs fail differently: no moving parts, but controllers that lock up, firmware that corrupts, and encryption that is on by default in many models. Recovery is firmware-level work and is covered on our SSD data recovery page, with a specific guide to the SanDisk Extreme portable SSD “no media” failure.
External drives by brand
Most external hard drives are built by a handful of manufacturers, and each family has its own quirks in bridge design, encryption, and firmware. We maintain brand-specific pages for the models we see most:
- Western Digital data recovery, including the hardware-encrypted WD My Passport and the WD Elements and Easystore lines.
- Seagate data recovery, including Seagate Backup Plus, Expansion, and One Touch portables.
- LaCie data recovery for the Rugged, d2, and 2big families common in creative studios.
Toshiba Canvio, Samsung, Buffalo, and G-Technology drives are handled the same way; the brand page is a convenience, not a requirement.
How the evaluation works
Every external drive that arrives goes through the same process. We identify the enclosure and drive model, check whether the bridge carries encryption, and test the enclosure and the drive separately. You receive an evaluation that explains what failed, what is recoverable, and a firm price before any work is authorized. Standard external drive cases are quoted as a flat fee after evaluation. If the drive turns out to be a simple bridge failure with a healthy, unencrypted drive behind it, we tell you that.
Our lab is in Madison, Wisconsin, and drives arrive from every state by mail or courier. Portable drives should be shipped in their enclosure, powered off, wrapped in something soft, in a box with at least two inches of padding on every side. Do not tape the drive itself.
Related guides
- Hard drive not showing up: the full diagnostic when a drive is detected but unusable.
- Fixing an external hard drive: what can and cannot be done at home.
- How to recover data from an external hard drive: the step-by-step version of the advice above.
- Laptop data recovery: the drive inside a portable external is the same 2.5-inch drive found in a laptop, and the failure modes match.
Get your external hard drive data back
Whether the enclosure died, the drive is clicking, or it went off the edge of a desk, start with an evaluation. Call 877-624-7206 to talk to a client advisor, or submit a case online and we will send shipping instructions for your external hard drive.