
Storage Spaces Data Recovery
A drive died on a Windows Server 2022 file server and the pool went read-only before the admin could get to it. A Storage Spaces Direct cluster lost a node during a firmware update, and even after the node came back, its capacity drives are stuck in “retired, removing from pool” and won’t clear. A journal SSD in a tiered pool wore out its write endurance and the entire virtual disk detached, taking the ReFS volume with it. Two drives failed in a two-way mirror on the same weekend and the pool won’t attach at all. A USB DAS enclosure renumbered the drives after a reboot and the pool now shows every disk as “retired” even though every disk is present and healthy. Someone pulled a physically failing drive out of the chassis without first marking it Retired in PowerShell, and now the mirror is stuck in a Warning state that no combination of Repair-VirtualDisk, Reset-PhysicalDisk, or Set-StoragePool -IsReadOnly $false will clear. Someone else ran diskpart clean on what they thought was a spare drive but was actually a pool member, and now the pool metadata on that drive is gone.
Storage Spaces — the storage virtualization layer that ships with every modern Windows and Windows Server release, and the substrate underneath Storage Spaces Direct in every Azure Stack HCI and clustered Hyper-V deployment — fails in ways that are specific to how it works, and are rarely well documented outside of Microsoft’s knowledge base and a handful of forum threads. When it fails badly, the failure is not at the filesystem layer, and running filesystem tools against it will not help. The pool itself, or the virtual disk, has stopped being reassemblable. That’s what this page is about.
Gillware recovers data from Storage Spaces pools and Storage Spaces Direct clusters when the built-in Repair-VirtualDisk path has stalled or failed, when member drives have been physically damaged, when pool metadata has been corrupted or overwritten, and when third-party recovery tools have made progress but produced only a flat dump of files rather than a reconstructed volume. This page walks through what actually lives on the disks in a Storage Spaces pool, how the failure modes we see most often play out, and what recovery looks like when the pool won’t come back on its own.
What this page covers, and what it doesn’t
Storage Spaces sits in the middle of a five-layer stack. Below it are the physical drives. Above it is the virtual disk it presents. Above that is a partition. Above that is a filesystem — almost always NTFS on Windows client, or ReFS on Windows Server and Storage Spaces Direct. Above that are the files.
When the top layers fail — when ReFS marks the volume RAW, when a Windows Update pushes ReFS from 3.4 to 3.7 and the older host can no longer mount it, when refsutil salvage produces incomplete results — the recovery work is filesystem work. That work lives on our ReFS data recovery page. When NTFS marks the volume RAW after living on top of a Storage Space, the corresponding filesystem work is on our NTFS data recovery page.
This page is about the layer directly under those filesystems: the pool, the virtual disk (Storage Space), and the metadata that turns a pile of individual drives back into one. In a serious multi-layer failure — and most Storage Spaces cases that reach us are multi-layer — we handle the whole stack. The pages just describe the layers separately.
Inside a Storage Spaces pool
The mental model that most people arrive with is “Storage Spaces is Microsoft’s answer to RAID.” That’s roughly true, but it misses the parts that matter for recovery. Storage Spaces is not a controller-managed RAID; it’s a software-defined pool of drives with resiliency implemented in the Windows storage stack, and its on-disk layout has enough moving parts that a bad shutdown, a mispulled drive, or a wrong PowerShell command can leave the pool in a state no built-in tool can reverse.
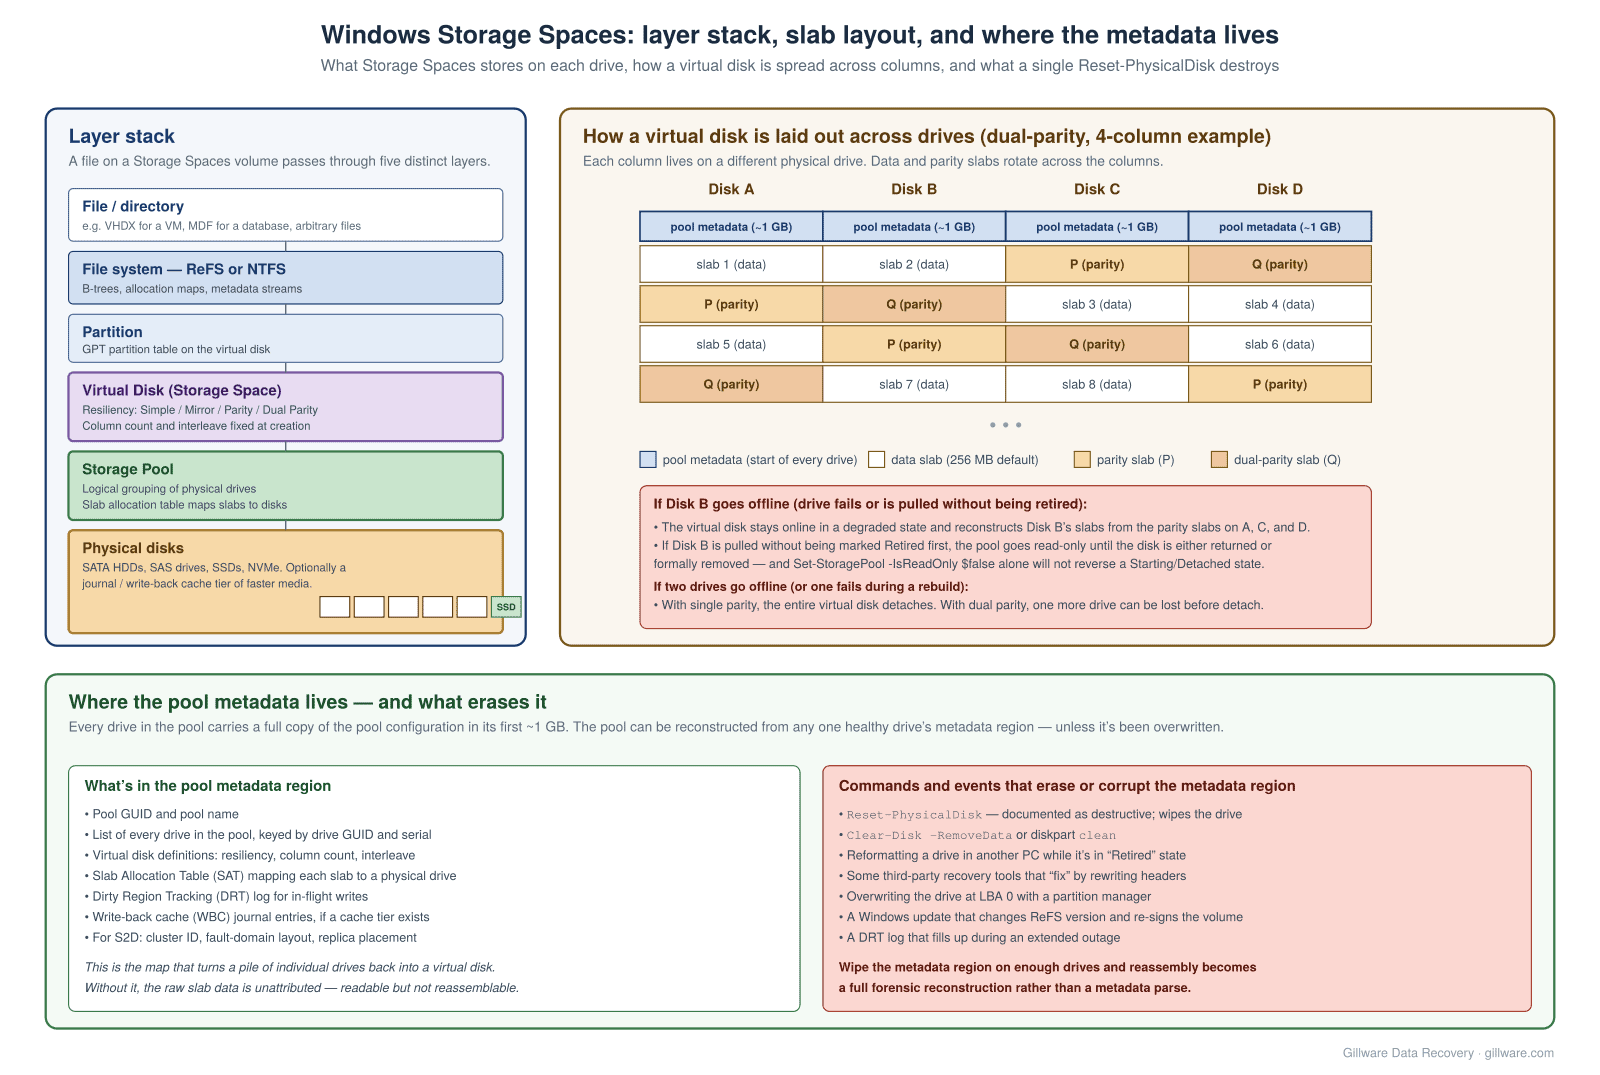
The pool, the virtual disk, and the partition on top
A storage pool is a logical grouping of physical drives. The pool itself doesn’t hold user data directly; it holds the drives, and it holds a metadata region on each of those drives describing which drives belong to the pool, how the pool is configured, and what virtual disks have been carved out of it. Pool metadata is written to every drive in the pool, so any surviving drive carries a full copy of the map. This is one of Storage Spaces’ genuine strengths — and also the property that makes Reset-PhysicalDisk so dangerous, because that command is documented to destroy exactly this region on the drive it’s pointed at.
A virtual disk — the actual Storage Space, in the Windows UI — is carved out of the free space in the pool. Every virtual disk has a resiliency setting (Simple, two-way Mirror, three-way Mirror, single Parity, dual Parity), a column count (how many physical drives it spreads across concurrently), and an interleave size (how big each per-drive chunk is). These settings are fixed at creation. You cannot change a virtual disk from 4-column to 6-column later. You cannot change parity to mirror. The virtual disk carries these settings in the pool metadata, and Storage Spaces uses them every time it reads or writes to figure out which drive owns which slab.
Above the virtual disk is a normal GPT partition table and a normal filesystem. The filesystem doesn’t know it’s on a Storage Space; it just sees a block device. This is why filesystem-layer recovery tools (chkdsk, refsutil, NTFS recovery software) can work on a Storage Spaces volume as long as the virtual disk is coming online cleanly, and why the same tools produce nothing useful when the virtual disk isn’t coming online.
Slabs, columns, and how a virtual disk is spread across the drives
Storage Spaces divides every virtual disk into slabs, 256 MB by default. Each slab is placed on a physical drive according to the resiliency policy. In a two-way mirror space with two columns and four disks, each slab has two copies, and the two copies live on different drives. In a dual-parity space with four columns, each stripe of a virtual disk consists of two data slabs and two parity slabs (P and Q), and the roles rotate across the four columns as the stripe number advances — the same pattern any RAID 6 array uses, just implemented in software with per-slab granularity instead of per-stripe.
Column count matters enormously in a recovery. Column count and interleave determine which slabs on which drives collectively make up any given range of the virtual disk. If a mirror space has two columns and one column’s drive fails permanently, every slab that had its only surviving copy on that drive is now unreadable. If a parity space has four columns and two drives fail, the entire virtual disk is offline until at least one of the two is restored, because two failed columns in a single-parity space means at least one stripe with two missing pieces and only one parity slab to reconstruct from.
The slab allocation table (SAT), stored in the pool metadata region, records which physical drive holds which slab of which virtual disk. When someone runs Reset-PhysicalDisk on a drive that’s still holding valid slabs of a virtual disk, the SAT on the surviving drives still knows those slabs existed and knows where they should have been — but the drive that held them is now blank. If the resiliency configuration provided enough redundancy to reconstruct them from the surviving drives, they can be rebuilt. If not, those slabs are gone in the same way any RAID 6 array loses data when a third drive is wiped.
The write-back cache and journal tier
Storage Spaces optionally supports a tier of faster media — typically SSDs or NVMe drives — as a write-back cache and journal for the slower capacity drives. In Windows client and non-clustered Server deployments this is called the write-back cache (WBC). In Storage Spaces Direct it’s called the cache tier. In both cases, writes hit the cache first, and are lazily destaged to the capacity tier.
The cache/journal tier is a common failure point. Cache drives take significantly more write traffic than capacity drives; consumer SSDs used as cache drives frequently reach their write endurance limit long before the capacity drives do; and replacing a cache drive without the correct PowerShell incantation — particularly the write-back cache size parameter that isn’t exposed in the GUI — frequently detaches the entire virtual disk because the pool tries to bring the new drive online with an incompatible cache configuration. We have seen cases where a working pool that had run for four years without incident detached permanently the moment an admin replaced a failed journal SSD following a well-meaning blog post.
The Dirty Region Tracking log
For mirrored spaces, Storage Spaces maintains a Dirty Region Tracking log (DRT) that records regions of the virtual disk with writes in flight. On a clean shutdown the DRT log is empty. On an unclean shutdown, the DRT log tells Storage Spaces which regions need to be resynced across mirror copies before the virtual disk can be safely brought online.
The DRT log has a fixed capacity. Under normal conditions it doesn’t come close to filling, because writes are quickly destaged and marked clean. Under prolonged outages — a node down for a week during hardware replacement, a controller stuck in a failed state that no one noticed for days — the DRT log can fill entirely. When it does, the virtual disk goes offline (Detached in the operational status output) and won’t come back until the DRT metadata is synchronized and flushed. Dell’s S2D troubleshooting knowledge base is quite specific about this failure mode; Microsoft’s documentation is less so, and admins meeting it for the first time frequently interpret the detached state as more serious than it is.
Storage Spaces Direct: nodes, fault domains, and cluster metadata
Storage Spaces Direct (S2D) extends Storage Spaces across multiple servers. Instead of a single machine’s drives forming a pool, the drives of every node in a failover cluster form a single distributed pool, and virtual disks are placed with fault-domain awareness so that a single node’s failure doesn’t take a virtual disk offline. The mental model is the same — slabs, columns, parity — but the fault domain is now the node rather than the drive, and the pool metadata is now a cluster-level artifact tracked in the Windows Failover Cluster database in addition to being written to every disk.
S2D failures we see: two-node clusters that lose quorum when the witness is missing or misconfigured; a node rebuilt after hardware failure whose SSDs still carry stale pool metadata from the previous life of the cluster and can’t rejoin; HBAs that were shipped in RAID mode instead of HBA (JBOD) mode and never got reconfigured; Mellanox and other RDMA network cards on firmware versions that pass Windows validation but produce subtle write corruption under load; and DRT logs that fill during extended outages while a node is offline waiting for parts. Every one of these is a Storage Spaces failure at the storage-virtualization layer, not a filesystem failure, and every one of them requires reconstructing the pool metadata to recover.
The failure modes we actually see
Cases arrive in a small number of recognizable patterns.
Drive pulled without being marked Retired
The single most common consumer/prosumer Storage Spaces failure. A drive is failing, or the admin wants to swap in a larger drive, or a drive is making noises. Someone physically pulls it out of the enclosure without first running Set-PhysicalDisk -Usage Retired and waiting for the data-evacuation job to complete. The pool detects the missing drive, marks it as failed, and takes the pool read-only to protect data integrity. In some cases the virtual disk detaches entirely.
The path back on paper is: reconnect the pulled drive, mark it Retired, wait for the evacuation job, then formally remove it. In practice the path back frequently doesn’t work — because the pulled drive was already failing and can’t stay connected long enough to complete the evacuation, because reconnecting it makes the pool see the drive as split (with divergent metadata from the surviving drives), or because someone tried Set-StoragePool -IsReadOnly $false, saw it not fix the problem, tried Reset-PhysicalDisk, and destroyed the metadata region on a surviving drive that could have been used to reconstruct the pool.
Recovery in this case is imaging every drive that was ever a member of the pool, parsing the pool metadata regions from all of them, comparing timestamps to identify the most recent coherent metadata generation, and reconstructing the virtual disk from that. The lower the write activity has been between the failure and the case arrival, the higher the recovery yield.
Journal or cache SSD failed and the virtual disk detached
An SSD in the write-back cache tier reaches its endurance limit, or the cache SSD dies suddenly. The virtual disk detaches. The admin replaces the SSD. Now they find that Add-PhysicalDisk with the new SSD doesn’t expose the write-back cache size parameter, so the pool comes back with a different cache size than it had before, and the virtual disk still won’t attach.
The data on the capacity tier is usually intact. What’s missing is the pool’s ability to reconcile the last known good state (captured in the old journal) with the new cache configuration. This is a reconstruction problem, not a data-loss problem. Recovery involves imaging the capacity tier, parsing the last-known-good journal fragment from the removed cache SSD if it’s recoverable, and reassembling the virtual disk directly from the images rather than through the Storage Spaces driver.
Multiple drive failures in a mirror or parity space
The RAID 5-style pattern, adapted to Storage Spaces. A two-way mirror loses one drive; the second drive fails during rebuild. A single-parity space loses two drives on the same weekend. A dual-parity space loses three. In all cases the virtual disk is now offline and there aren’t enough surviving columns to bring it back online through Repair-VirtualDisk.
Recovery here depends on how much data is actually gone. If the second drive failed while it was mostly readable (bad sectors, mechanical issues, controller-side failures), imaging both drives forensically often recovers enough surviving slab data to reconstruct the virtual disk with far fewer lost slabs than the pool itself believed. If both drives have suffered total media failure, recovery is bounded by what physical mediation can retrieve from each drive individually before we ever get to the pool layer.
Loose cable, USB DAS renumbering, or HBA-mode misconfiguration
These aren’t actually drive failures, but they present as ones. A SATA cable on one drive works its way loose during a physical move; Storage Spaces sees the drive drop off and marks it Retired. A USB DAS enclosure with four bays renumbers its drives after a reboot, and Storage Spaces sees the pool as broken because every drive shows up on a new disk number. An HBA card that was shipped in RAID mode is presenting its drives as tiny virtual disks instead of pass-through, and Storage Spaces refuses to add them to the pool at all — and in some cases has already added them to a pool as tiny drives, which produces the same “retired” behavior as a drive that’s actually failed.
In every one of these the physical data is fine. The recovery is often as simple as identifying the drive-identity mismatch, presenting the drives correctly to a temporary rig, and letting the pool come back on its own. What makes them dangerous is that the standard troubleshooting steps — Reset-PhysicalDisk, remove and re-add, repartition the drive in Disk Management — destroy the pool metadata that would otherwise have gotten everything back with no effort.
Over-provisioned thin pool ran out of physical capacity
Storage Spaces supports thin provisioning, and Windows Admin Center encourages it. Under thin provisioning, a virtual disk can be defined as larger than the pool’s physical capacity. When the physical capacity fills, the pool goes read-only. The virtual disks stay online but new writes fail; the situation looks superficially like corruption because applications throw disk-full errors, but the data itself is intact.
The reason this pattern reaches our lab is that the admin, seeing the pool in a bad state and not understanding why Set-StoragePool -IsReadOnly $false doesn’t work, escalates to Reset-PhysicalDisk or a full pool destruction “to start fresh.” The pool was never actually damaged; it was just full. But by the time it reaches us, the metadata is gone from at least some drives.
S2D node rebuilt, drives stuck in “retired, removing from pool”
A Storage Spaces Direct node loses its OS drive (or has to be re-imaged after a compromise, or gets rebuilt after a firmware update goes wrong). The admin reinstalls Windows Server, rejoins the cluster, and expects the S2D pool to accept the node’s existing drives. Instead the drives show as failed with a state of “retired, removing from pool” that no combination of Retire, Remove-PhysicalDisk, or Reset-PhysicalDisk will clear.
What’s happening under the covers is a metadata mismatch: the S2D cluster database on the surviving nodes still associates the drives (by serial number) with their pre-rebuild pool membership. The drives themselves still carry pool metadata from the previous OS install. Neither side agrees with the other, and Storage Spaces’ response to disagreement is to refuse to write. The Microsoft-recommended path is a full pool metadata wipe and reintroduction, which works — but only after backing up any data that’s still accessible on the surviving nodes. When customers reach us at this point, it’s usually because the pool went into a state that didn’t leave the surviving data accessible, and the metadata wipe would have completed the data loss.
DRT log filled, cluster shared volume detached
An S2D cluster survives a prolonged outage — a hardware failure that took a week to source parts for, an extended network partition, a firmware update that put a node into a boot loop that no one noticed for days. When the affected node comes back, one or more Cluster Shared Volumes are in a Detached state and cannot be brought online.
The failure is DRT-log saturation. Recovery here is documented and works reliably when caught early: run the Data Integrity Scan for Crash Recovery task on every node where the detached CSV was previously online, set DiskRunChkDsk to 7 on the physical disk resource, and let the pool self-heal. What’s hard is when someone has already tried to force the CSV online by other means, at which point the DRT metadata is in an inconsistent state and the automated repair no longer resolves it. That’s the case that reaches us.
Windows Update killed ReFS on the Storage Space
This one bit an entire generation of Windows Server 2019 admins. In early 2022, KB5009557 caused ReFS 1.x volumes hosted on top of Storage Spaces to mount as RAW after the update installed. The Storage Space itself was fine. ReFS on top of it was fine on the disk. The Windows update simply pushed a driver change that couldn’t mount the older ReFS version, and unless you uninstalled the update, the volume stayed RAW. Similar version-mismatch issues have appeared since then when a ReFS 3.4 volume gets mounted temporarily by a Server 2022 host (which silently upgrades the ReFS version to 3.7) and then can no longer be mounted by the Server 2019 host it belongs to.
This is a ReFS problem, not a Storage Spaces problem, but customers commonly reach us thinking the pool has broken. The pool is fine; the filesystem on top of it needs recovery. Our ReFS data recovery page covers the recovery side of that failure.
The repair-tool trap: what actually destroys a Storage Spaces pool
This section exists for the same reason our SQL Server page has a DBCC CHECKDB REPAIR_ALLOW_DATA_LOSS section and our NTFS page has a chkdsk section. Every mature storage system ships with a repair path that’s documented as destructive if used wrong, and every one of those paths gets reached for by admins in a hurry who read the first Google result and assumed the tool would help them.
For Storage Spaces the destructive commands, in rough order of how often we see them applied to still-recoverable pools:
Reset-PhysicalDisk is the big one. Microsoft’s own documentation opens with “For Storage spaces, this is a destructive operation that removes the Storage pool configuration and pool data from the specified physical disk.” It wipes the metadata region on the specified drive and returns the drive to the pool as empty. If the drive still held slabs whose data hadn’t been reconstructed onto surviving drives, that data is gone. If the drive held the last surviving copy of the pool metadata after a series of other events had damaged the metadata on the other drives, the pool is now unreassemblable. This is the command most consistently applied to drives that could otherwise have been used to recover from.
Clear-Disk -RemoveData and diskpart clean are the direct equivalents at the disk layer — both destroy the pool metadata, both destroy any partition and filesystem structure, both are frequently used by admins who mistakenly identify the wrong drive as the failed one.
Set-StoragePool -IsReadOnly $false is not itself destructive, but it’s frequently the first thing tried, and its failure to fix a read-only pool is what leads admins to the destructive commands above. The command works only when the pool is in an actually-writable state that’s been marked read-only administratively. When the pool is read-only because of a Starting, Detached, or metadata-inconsistency state, this command does nothing, and the pool remains read-only for reasons the command cannot address.
Reformatting a “retired” drive in another machine is a pattern we see in cases where an admin thinks a drive has been fully removed from the pool because it’s in the “Ready to remove” state, physically pulls it, connects it to another PC, and reformats it — not realizing that “Ready to remove” is a step in the removal process, not the completion of it. In a two-way mirror where the drive being “removed” still holds the only live copy of half the pool’s slabs, reformatting it in another machine wipes out that copy. This is a Windows UI issue as much as anything; the naming does not reflect the actual state.
Third-party recovery tools are their own category. Reclaime, ReclaiMe Storage Spaces Recovery, DiskInternals RAID Recovery, R-Studio, UFS Explorer RAID Recovery, Disk Drill, and a handful of others all advertise Storage Spaces recovery. Some of them read the pool metadata region correctly, reconstruct the slab allocation table, and produce a walkable virtual disk from which files can be extracted. Others scan the drives for filesystem signatures and produce a flat dump of every recognized file without directory structure, which is often useful for consumer photo recovery and useless for a business trying to recover the exact folder hierarchy of a file server. The material distinction on any given tool is whether it reconstructs the virtual disk (in which case you get a mountable image and a walkable filesystem) or reconstructs only the files (in which case you get a bucket of orphaned data).
If a third-party tool is on your list of things to try, three rules matter. First, don’t run it against the original drives — image them first, then work on the images. Second, if it wants to write anything at all to the drives (even a “fix headers” option, even an “attach the pool” operation), decline that option and use it read-only. Third, if it produces a flat file dump rather than a mountable virtual disk, and you actually needed the directory structure, don’t rerun it with more aggressive settings — the flat dump is the tool’s ceiling, not its starting point.
What Storage Spaces recovery looks like at Gillware
When a Storage Spaces case arrives here — whether it’s a set of physical drives from a broken pool, a set of drives from an S2D node that won’t rejoin, or a set of forensic images made by the customer before things got worse — the first step is always the same: image every drive that has ever been a member of the pool, and work exclusively against the images. The original media is never modified.
From there the work proceeds bottom-up.
If any drives are physically damaged, they go through our standard drive-imaging workflow — head swaps, PCB work, platter burnishing, firmware repairs, whatever’s needed to get a clean image of the surviving sectors. Storage Spaces pools with multiple failed drives are typically the case where this matters most; if we can recover 95% of the sectors from a drive the pool itself gave up on, that’s enough to reconstruct the missing slabs from that drive without needing to rely on parity or mirror data.
Once we have clean images of every drive, our internal storage parser reads the pool metadata region from each image. In a healthy pool every drive carries the same generation of metadata, and we simply pick any drive and use its metadata to describe the pool. In a damaged pool, drives may carry different generations — some drives were retired days ago, some drives were removed but still hold older metadata, some drives had Reset-PhysicalDisk run against them and hold no metadata at all. Reconciling these into a single coherent view of the pool is manual work: comparing generation numbers, matching drive GUIDs against the pool’s expected member list, identifying which virtual disks were defined and what their column layouts were.
Once the pool structure is coherent, we reconstruct the slab allocation table — the map that says, for every slab of every virtual disk, which physical drive it lives on. From that map, we walk each virtual disk slab by slab, reading the correct slab from the correct drive image (or, for mirror and parity spaces, reading the surviving copies and reconstructing missing slabs from parity where possible), and producing a complete image of the virtual disk as it would have appeared to the filesystem above.
That virtual disk image is then handed off to the filesystem parser. If the filesystem is NTFS, our NTFS parser walks the MFT and extracts files. If it’s ReFS, our ReFS parser walks the B-tree and does the same. Either way, the deliverable is the file structure the customer had before the pool broke — not a flat dump of every file the drives happened to contain, but the actual directory hierarchy with the actual filenames and the actual folder structure.
For customers who need to bring the volume back to a running Windows Server rather than just extract files, we can also deliver the reconstructed virtual disk image as a VHDX that can be mounted directly by Hyper-V or attached as a virtual disk to a Windows host. This is common for Storage Spaces Direct cases where the goal is not just data recovery but restoration of the running workload.
When to send a Storage Spaces case to us
The sooner the better, and the less written to the pool between the incident and the case arrival, the higher the recovery yield. Cases in these categories are handled under our complex-case engagement terms:
- Any pool that has gone read-only after a drive was physically pulled without being marked Retired first, and the pulled drive is either failing or has been reformatted. Do not run
Reset-PhysicalDiskon any remaining drive. - Any virtual disk in a Detached state where the underlying journal or cache SSD failed. The capacity tier is usually intact and the recovery is a pool reassembly rather than a filesystem repair.
- Any pool where two or more drives have failed in a resiliency setting (mirror, single parity, dual parity) that can’t tolerate the loss. Every drive is worth imaging even if it’s not fully readable; partial reads are still material.
- Any Storage Spaces Direct cluster where a node rebuild has left drives stuck in “retired, removing from pool” and the cluster continues to serve reduced capacity. Do not wipe the affected drives without confirming what data still lives on them.
- Any pool where a Windows Update caused a virtual disk to appear as RAW. Do not run refsutil, chkdsk, or any format operation against the volume until we’ve determined whether it’s a pool-layer or a filesystem-layer problem. If it’s the filesystem layer, our ReFS recovery workflow picks up.
- Any pool where a third-party recovery tool has produced a partial or flat-dump recovery and the customer needs the actual directory structure. In most cases the pool can still be reconstructed properly from the original images if the tool wasn’t allowed to write to the drives.
- Any Storage Spaces case that involves Hyper-V VHDX files on top of the pool. VHDX corruption from a broken storage substrate is a two-layer problem; we handle both. See our Hyper-V data recovery page for how these cases layer.
- Any Storage Spaces case that involves a SQL Server, Exchange Server, or other database workload with files on top of the pool. Once the pool is reassembled, the workload files are our SQL Server or Exchange Server recovery workflow.
Every case starts with a free consultation, and you approve all recovery fees in writing before any recovery work begins. Gillware has been recovering data from Windows storage substrates for more than two decades, starting with the software RAID that predated Storage Spaces and running through today’s Storage Spaces Direct clusters on Azure Stack HCI hardware. The technology names have changed. The recovery pattern — image everything, reconstruct the storage layer from imaged member drives, hand a coherent virtual disk to a filesystem parser, deliver the actual data with an actual file manifest — has stayed consistent, and the work follows it accordingly.
This page is part of our broader Windows data recovery pillar. If your Storage Spaces failure is one piece of a larger disaster involving multiple workloads or ReFS/NTFS damage on top of the pool, we handle the whole picture.
Storage Spaces pool read-only, virtual disk detached, or S2D cluster refusing to reassemble?
Book a free consultation with Gillware’s enterprise storage engineers. Call 877-624-7206 or start a case online.