Disk Recovery Mac
There are a number of issues that can be resolved with disk utility on a Mac that was booted into recovery mode. For more information on utilizing this strategy for disk recovery Mac, read on!
Apple is well known for producing computers with a sleek modern appearance, intuitive operating systems, and above average internal components. While many Mac users will never experience any meaningful issues with their computer(s), the unlucky crowd that does encounter problems has a number of troubleshooting options. Many users will simply take their computer to the nearest Apple store and ask someone else to fix it. Other Mac users will attempt to resolve issues independently. This article is definitely intended for the latter.
Mac Recovery Mode Disk Utility
All Macs released over the last two decades utilize the Mac OS X operating system. For the sake of simplicity, the term Mac OS X will be used to refer to the more recently rebranded OS X and macOS. Mac Recovery mode, also known as safe mode, is a boot option with Mac OS X that allows users to troubleshoot problems in a restricted environment. Mac OS X also comes equipped with a number of system utilities that enable technically advanced users to monitor and / or interact with their computer’s hardware and software. One such tool is disk utility.
Recovery Mode Overview
Recovery mode (also known as safe mode) is a restricted boot option available on computers running Mac OS X. Recovery mode enables users who have encountered a problem to troubleshoot their issue in an environment where startup items and login items are disabled, fonts are restricted, and the system executes a file system repair process. Recovery mode can be accessed by holding down the shift key upon initially powering up the computer.
Disk Utility Overview
Disk Utility is a built-in tool available with every computer running Mac OS X. It would be easy to assume Disk Utility simply displays the technical details for storage devices connected to the computer. While this is true, it does not acknowledge the myriad of powerful features packed into this application. Two of the most widely applicable Disk Utility tools are the Erase and Partition options.
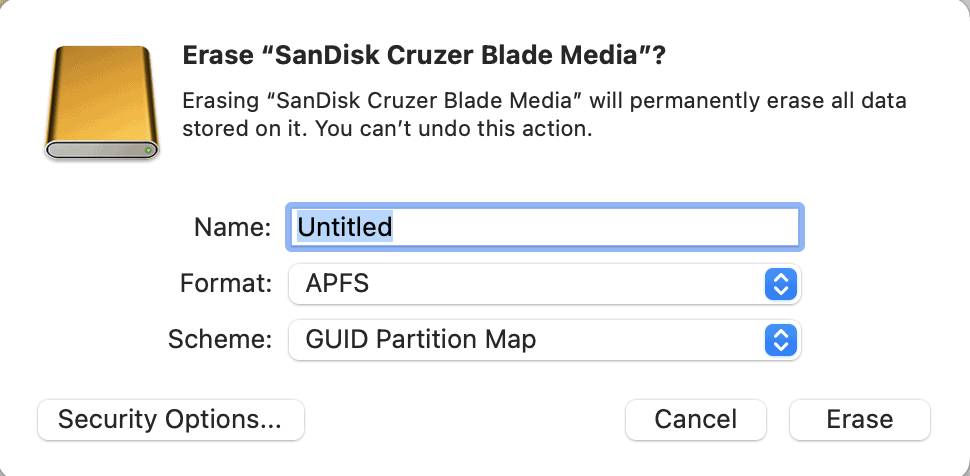
Erase – Disk Utility
The Erase functionality does exactly what you think it does, it erases electronic storage devices. For example, let’s assume a user is interested in erasing a flash drive or external hard drive for security reasons. They plug the device into their Mac and navigate to Applications > Utilities > Disk Utility to open Disk Utility. They select the appropriate device from the menu on the left and click the Erase button in the main header menu. Disk utility will allow this individual to specify their security preference for the erasure. There is a linear correlation between how long the “Erase” operation takes and how secure the new drive will be. If you refer to the following screenshot, you will see that the user also has the option to rename the device, select a file system (this is labeled “Format”), and select a Scheme.
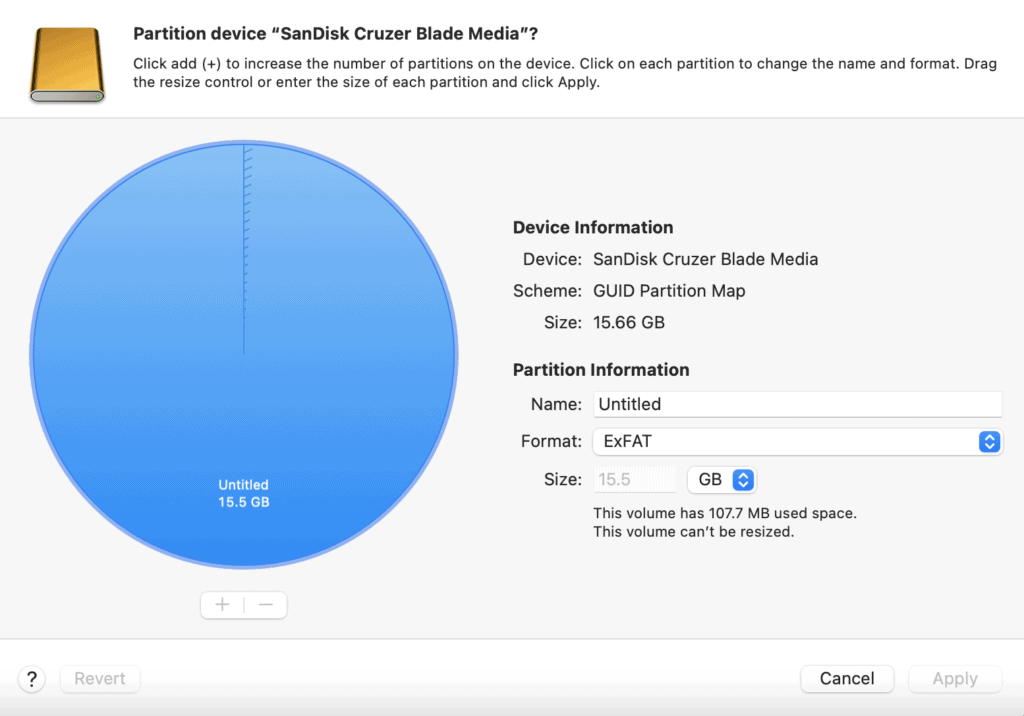
Partition – Disk Utility
If you’re wondering what partitioning is, it is simply the process of creating a storage device with logically distinct regions. Disk Utilities Partition functionality allows Mac users to create new partitions and manage existing partitions. The process for utilizing the partition functionality of Disk Utility is similar to using “Erase”. The user opens Disk Utility, selects the device they intend to modify, and clicks the button labeled “Partition” in the header menu. If you refer to the image with the blue circle, you will see similar user input fields to the “Erase” tool; the user can name the new partition, format the partition, and select the size for the partition.
Additional Information
More on Computers Made by Apple
There are a wide variety of computers produced by Apple. Some are currently available for purchase, many are in-use today, and others are no longer operational. This is unsurprising for a computer manufacturer that has been releasing products for nearly 50 years. In 1976, Steve Wozniak, Steve Jobs, and Ronald Wayne founded The Apple Computer Company. The first two computers released were (somewhat uninspiringly) named the Apple I and Apple II. The existence of these two machines is why every Apple computer cannot accurately be referred to as a Mac. The Macintosh was released in 1984, eight years after The Apple Computer Company was founded. The iMac was released in 1998, and Mac OS X came out in 2001.
More on Mac OS X
Classic Mac OS version 9 was the operating system that preceded Mac OS X. Similarly, to the iPhone X, Apple utilizes X, the roman numeral for ten, to signify that Mac OS X is the tenth Mac operating system. Since the initial release in 2001, Mac OS X was rebranded as OS X and then macOS. Despite different versions and official nomenclature, macOS is an intuitive operating system that is a favorite among artists and students. As you certainly noticed in the previous section, Mac OS X provides more technical users with a variety of system utilities for effectively managing their hardware and software.
