If your RAID 5 array has failed and you need the data back, you’re in the most common RAID-recovery situation we see. RAID 5 is the workhorse storage configuration in small and mid-market business IT — striped data with one rotating parity block per stripe, tolerating the failure of any one disk. The catch is that RAID 5 with a failed drive is the highest-risk configuration in IT, because the second drive failure that finishes the array off often happens during the rebuild. Gillware has been recovering RAID 5 arrays since 2004 in our ISO 5 Class 100 cleanroom in Madison, Wisconsin. Every case starts with a free in-lab evaluation. See also our RAID data recovery hub.
Start a free RAID 5 recovery evaluation →
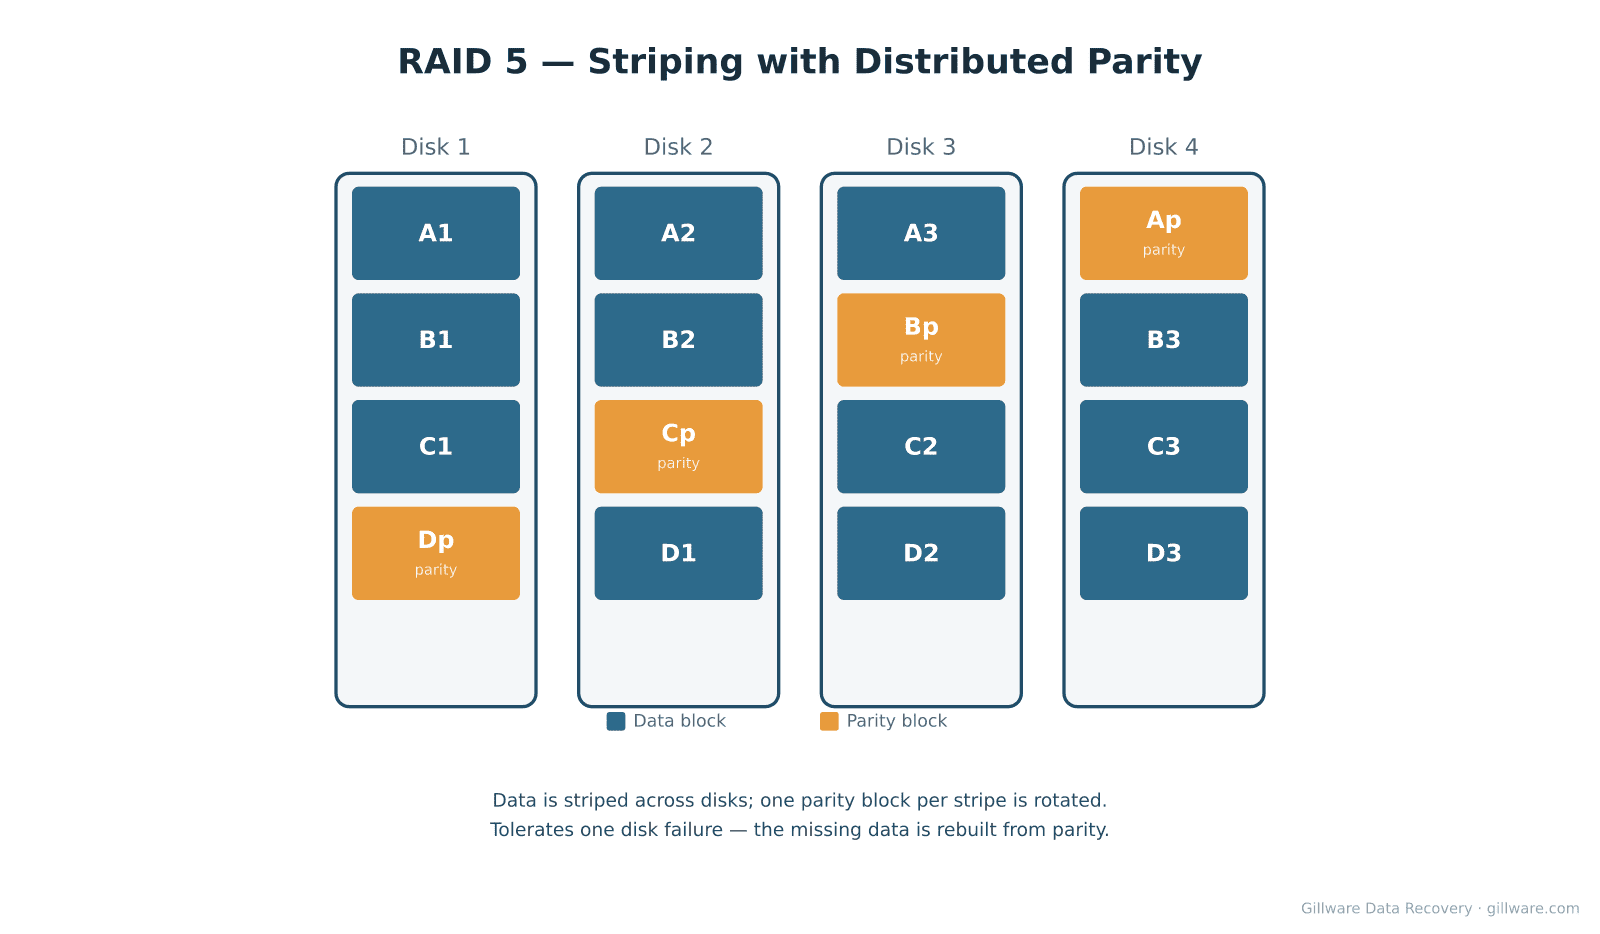
How RAID 5 Works
RAID 5 stripes data across all the disks in the array, plus one parity block per stripe. The parity block is computed as the XOR of the corresponding data blocks, and it rotates across the disks — on one stripe the parity sits on disk 4, on the next stripe on disk 3, and so on. When any one disk fails, the missing data can be reconstructed by XOR-ing the surviving data blocks with the parity block on each stripe. The trade-off: total tolerance is one disk failure, and a second concurrent failure ends the array.
Why RAID 5 Arrays Fail
Failed rebuild on a degraded array. This is the single most common cause of RAID 5 data loss we see. One drive fails, the controller marks the array degraded, a replacement drive is inserted, and during the rebuild a second drive develops read errors — or simply fails outright. The rebuild stops in a partial state and the controller refuses to mount the array. We have a dedicated page on RAID punctures and failed rebuilds if you’re in that situation right now.
Multiple disk failures beyond fault tolerance. Two drives fail at nearly the same time — often because both came from the same manufacturing lot, were the same age, and reached end of life together. On paper this means total loss. In practice, one of the “failed” drives is often only marginally degraded, and our cleanroom engineers can sometimes resurrect it long enough to image, restoring single-fault tolerance.
Controller failure. If the RAID controller dies or its configuration metadata is lost, the OS no longer knows how to assemble the array. The drives are healthy; the array is gone. We reverse-engineer the stripe parameters and reconstruct the array in software without depending on the original controller.
Unrecoverable read error during rebuild. On large arrays with high-capacity drives, the statistical odds of hitting a single unrecoverable read error somewhere on the surviving drives during a full-array rebuild approach 1:1. When that happens, the rebuild aborts. The data is still there; the controller can’t get to it.
Foreign array after a controller swap. Replacing the controller or motherboard can cause the new controller to fail to recognize the existing array configuration. The drives are intact but show as foreign. More on foreign-array recoveries here.
How We Recover RAID 5
The RAID 5 recovery process at Gillware never operates the original array. Running a degraded RAID 5 during recovery risks pushing the next drive over the edge and turning a recoverable case into an unrecoverable one. Every disk is imaged on isolated, write-blocked hardware in our cleanroom. Physically damaged disks are repaired with donor parts as needed before imaging.
Once we have images of every disk in the array, our engineers reverse-engineer the original RAID parameters — stripe size, drive order, parity rotation direction, parity algorithm variant, starting offset — from the on-disk metadata. We do not require the original controller or its configuration backup; the parameters are recovered from what’s written on the disks themselves. Our in-house RAID software (HOMBRE) then assembles the virtual array from the images. File-system recovery proceeds on the reconstructed volume.
For arrays with two drives in failed state, we work disk-by-disk to image whatever can be read from each. Often a drive that the controller marked as failed has only a small region of unreadable sectors, and the rest of the surface is intact. In those cases the reconstruction proceeds normally for the readable regions, and we report exactly which files (if any) are affected by the unreadable regions.
Related RAID Recovery Pages
Other RAID levels we recover: RAID 0 · RAID 1 · RAID 6 · RAID 10 · JBOD. Return to the RAID data recovery hub for the full overview of how Gillware handles RAID, NAS, SAN, and server array recoveries.
Start Your RAID 5 Recovery
If your RAID 5 array is down and the data on it matters to your business, the next step is to power the array off (do not attempt another rebuild) and start a free evaluation. Label each disk with its bay position before removing anything from the chassis.
Start a free RAID 5 evaluation →
Prefer to talk to someone first? Call 1-877-624-7206 during business hours (M–F 8 am–7 pm, Sat 10 am–3 pm Central) or schedule a 15-minute consultation with a client advisor.