Standard RAID Levels Explained
Table Of Contents
show
Gillware deals with a lot of failed RAID systems on the side of data recovery. Partially because problems can arise with so many hard drives running, but more likely because their array was not handled correctly. RAID can be extremely complex, so it shouldn’t be surprising. In this post, we’ll explain some of the standard RAID levels so people can understand the purpose of RAID a bit better.
First and foremost, RAID stands for Redundant Array of Independent (or Inexpensive) Disks. RAID is a way of utilizing multiple hard drives to improve performance or provide redundancy/fault tolerance, depending on which configuration you’re using. There are both single and double (and rarely triple) digit levels, with two digit configurations such as RAID 10 signifying a nested level that would more appropriately be referred to as RAID 1+0.
To set up a Redundant Array of Independent Disks, a RAID controller is required. This can be either a piece of hardware or software that ensures your hard drives work together logically in a RAID setup. Without it, you just have multiple singular, separate hard drives.
Standard Levels
RAID 0
RAID 0 is purely for performance, requires a minimum of two drives, and uses disk striping to improve read/write speeds. It’s occasionally used by businesses but is more likely to be used by home PC users. The way it works is by essentially splitting your data up and saving half to one drive and half to the other. Because you now have two drives to perform the same task that was being performed by one before, it will be done much more quickly.
You can also use more than two drives to even further improve read/write performance, though there are diminishing returns. Additionally, RAID 0 uses block-level striping, as opposed to either bit or byte-level (RAID 2 and 3 respectively). While RAID 0 improves performance, it doesn’t offer any redundancy or fault tolerance, so if one drive fails, all your data is gone. Therefore, it is absolutely imperative that you consistently back up your data if you’re running RAID 0.
RAID 1
RAID 1 is simple disk mirroring and requires a minimum of two drives. When data is saved to one drive, it is immediately copied to the other drive. If one drive fails, the other one still has all your data. If both fail, well the outcome should be obvious. While it provides nice redundancy, one problem with RAID 1 is that because it’s saving everything to both drives, your write performance suffers a bit. Another drawback is that your effective storage is halved. For example, if you have two 1TB drives, equaling two Terabytes of total storage, you only have 1TB of effective storage in RAID 1 since both drives are saving all your data.
RAID 5
RAID 5 is most often used by businesses and requires a minimum of three drives. First, the RAID-controller stripes the data onto the first two drives (acting the same as RAID 0). It then takes the data from drives 1 and 2 and creates parity bits that it then puts in drive 3. Using XOR (exclusive-or) logic, the parity bits make it possible to lose one drive and still have all of your data. Even though you should theoretically lose your data if you lose drives 1 or 2 (like in RAID 0), the RAID-controller is able to use parity bits along with the bits in the remaining drive to reconstruct the bits of the failed drive. Here’s the basic pattern for creating the parity bits:
| Drive 1 bit | Drive 2 bit | Parity Drive bit | ||
| 0 | + | 0 | = | 0 |
| 0 | + | 1 | = | 1 |
| 1 | + | 0 | = | 1 |
| 1 | + | 1 | = | 0 |
Using this table, the RAID-controller is able to figure out what the missing bit should be and then logically reconstruct the failed drive.
RAID 6
RAID 6 can be thought of as a tougher version of RAID 5 because there are two parity drives rather than just one. Up to two drives can fail before data becomes unrecoverable.
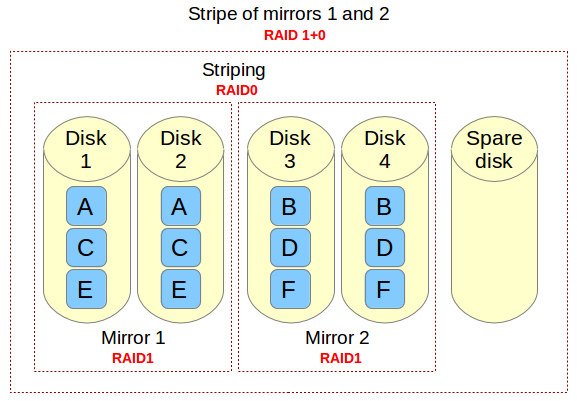
RAID 10
RAID 10 is one of the potential nested configurations we can discuss. Also referred to as RAID 1+0, this RAID configuration combines RAID 1 and RAID 0. Using the mirroring from 1, you get redundancy/fault tolerance. Using the striping from 0, you get better performance. Logically, it requires a minimum of four drives to function, since you need a minimum of two drives to stripe in addition to two drives to mirror both of those striping drives. This makes it a rather expensive RAID level, but can be extremely useful.
To explain in more detail, it is a stripe of mirrors. You have two drives on either side, to make a total of four drives. Two drives on one side mirror each other, and the two on the other side mirror each other. The first thing to happen is the striping, or the RAID 0 function, which saves to one of the drives on either side. After that, the mirror drives on either side receive a copy of their half of the data. Up to one drive on both sides may fail without data loss. If both drives on one side fail, you have a catastrophic failure similar to that of RAID 0 where all your data is lost.
Other Possible Levels
There are many other potential RAID levels, however they’re all essentially varied combinations of the functions these RAID levels use. Now that you know the basics of what RAID setups can do, you should be able to understand the rest if you decide to learn about the other levels.
Other potential RAID levels include RAID 2, 3, 4, 01 (different from 10 in how it works), 03, 50, 100, and so on.
Remember, RAID can be extremely useful for your home or business, but you should understand what you’re doing before you decide to create an array. If you go in without a proper understanding, you might set it up improperly or put yourself in a situation that could lead to data loss. If you do your research, you’ll be fine!
